Papyrus Author offers numerous interlinked functions that make the revision process for you and your proofreader much easier.
This includes the comment boxes, which allow you to make comments that appear on the right edge of the document without being part of the text itself.
Additionally, the highlighter option enables you to highlight parts of your text in different colors. You can also leave comments attached to the highlighted areas.
Then there is the revision tracking. This feature allows you to track changes in the text made by you and your co-authors and lets you decide later whether to accept them or not.
There is a wide variety of options for making notes and comments outside of the main text. There are the “Notes” in the Navigator, the Pinboard, “Ghost Texts,” and much more.
Revision Tracking–Adding and Deleting Text
When your text is proofread/edited (by you or someone else) you can track the changes so you are able to go back and see exactly what corrections have been made.

Revision Tracking: Inserted and deleted text
You can choose to accept or reject the changes and go back to the original either one by one or all at once.
This function is there for when you give your text to a proofreader or editor. As long as the editor works with Papyrus Author, MS Word, or Open Office, you will be able to see what has been changed during the proofreading process.
The revision tracking is compatible with MS Word. This means you can give your texts to an editor who doesn’t work with Papyrus Author in either docx, DOC and/or RTF format. When your editor sends you back a MS Word DOC or RTF, you can use Papyrus Author to go through the edited version and see what has been changed.
Of course, you can also edit your text yourself and come back to it later to see which version you prefer.

Deleted text
You can choose how inserted text will appear in “Preferences” → “Comments, etc.” How deleted “mummified” text will be shown can also be set here. It will appear with a “mummy” symbol ![]() , as crossed-out text, or as a special comment on the edge of the document.
, as crossed-out text, or as a special comment on the edge of the document.
The mummy symbols ![]() can only be seen when you have not chosen “Display as Print Preview” under the “View” menu.
can only be seen when you have not chosen “Display as Print Preview” under the “View” menu.
By hovering your cursor over the mummy symbol ![]() you will see the deleted text pop up in a tooltip. If the text is too long, you will only see a portion of it.
you will see the deleted text pop up in a tooltip. If the text is too long, you will only see a portion of it.
A “mummy” only saves plain text; specific text attributes will not be saved.

A text mummy
If you choose to display deleted text as crossed out text (as opposed to mummies), you will be able to see it in print-outs and PDF versions. This way you can work on the changes made by your editor or proofreader on paper.

Special print options
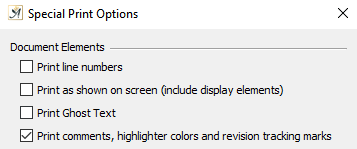
Whether and how your tracked changes will be printed, can be set in the “Print” dialog in the “File”-Menu under “Special Print Options” by checking the box “ ![]() Print comments, highlighter colors and revision tracking marks.”
Print comments, highlighter colors and revision tracking marks.”
Remember that mummies only contain plain text and any text style (bold, italics, etc.) will be lost when you mummify text.
When changes are being tracked ![]() inserted text will be shown in another color as well as with a specific marking (circled, underlined, etc.).
inserted text will be shown in another color as well as with a specific marking (circled, underlined, etc.).
These settings can all be changed in “Preferences” under “Revisions/Comments”

Revision tracking preferences
Deleted text, if it is not displayed as a mummy, will also be colored and marked as you choose (we recommend “strike out” or “cross out”).
How you want to display inserted or deleted text (strike out, framed, etc.) is freely selectable.
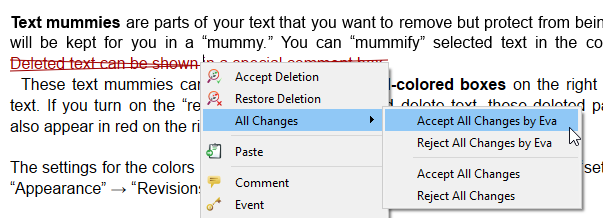
Insertions and deletions/mummies can be accepted or rejected one by one in the context menu ![]() . You also have the option to accept or reject all changes in the document at once.
. You also have the option to accept or reject all changes in the document at once.

Accepting and rejecting changes
A few things to note about the revision tracking feature:
- Writing over a text passage will be treated as an insertion and a deletion.
- Deleted text cannot be inserted into another piece of deleted text.
- Changes to the text or paragraph style as well as changes to pictures or graphics will not show up under tracked changes.
