
Table of Contents
Colors for Graphic Objects, Text, Lines…
In the “Color” dialog (under “Text” menu) you can set either a basic color, or a user-defined color for a variety of graphic objects, and text including: all monochrome graphic objects, fill patterns, lines, selected blocks of text, and the text where you cursor is currently placed.
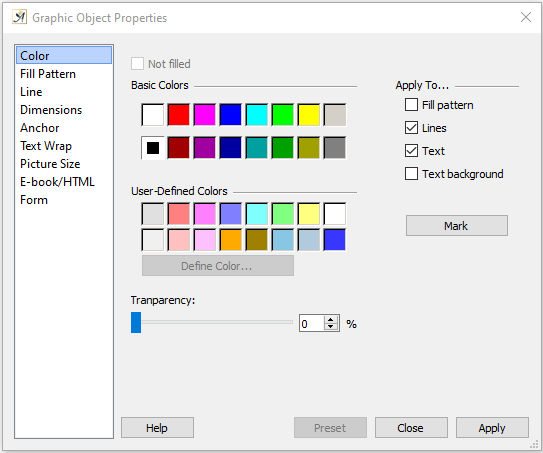
The Color dialog
Using the check-boxes on the right side of the dialog, you can decide which color you would like to apply to the ![]() Fill pattern,
Fill pattern, ![]() Lines,
Lines, ![]() Text, or for the
Text, or for the ![]() Text background.
Text background.
Colors will be applied with the selected check-boxes when you hit ![]() .
.
With ![]() you can find/locate text with a specific color in your document and select these areas as a block.
you can find/locate text with a specific color in your document and select these areas as a block.
The “Define Color…” button will open a dialog with a color pallet, in which you can choose a basic preset color or define a color of your own.
If you want to change the settings for a graphic object in this dialog, you will first need to activate it by clicking on it.
If you would like to save your settings in this dialog and apply them to all newly opened or created graphic objects, you can use the button “Preset.”
Other color settings in Papyrus Author are valid for the entire software program, so they will also be found in other locations:
- The “Selected text” color, which you will see when you select text as a block is set in “Preferences” → “Appearance” → “Display”.
- The colors for margins, symbols (e.g. anchors), spaces, tabs, paragraph breaks, magnetic guidelines, etc. can all be set in “Preferences” → “Appearance” → “Element Display”.
- “Highlighter Colors,” which you can use to highlight various portions of your text and add comments can be set in “Preferences” → “Appearance” → “Notes/Highlighters “.
- “Sticky Note Colors,” which determine how your sticky notes will appear can also be set in the “Notes/Highlighters“ dialog.
- The colors used in the “Check Spelling/Grammar…” can be set in “Preferences” → “Spell Checking” → “Markup Colors”.
- The colors used by the “Style Analysis” to highlight various style elements in your text that could be improved can be set in “Preferences” → “Spell Checking” → “Style Analysis”.
Color Selection
The “Select Color” dialog opens when clicking on a color tile for a document element and is also accessible in the “Color” dialog (menu “Text” → “Color” or “Insert”→ “Graphics”→ “Graphic Properties” ).
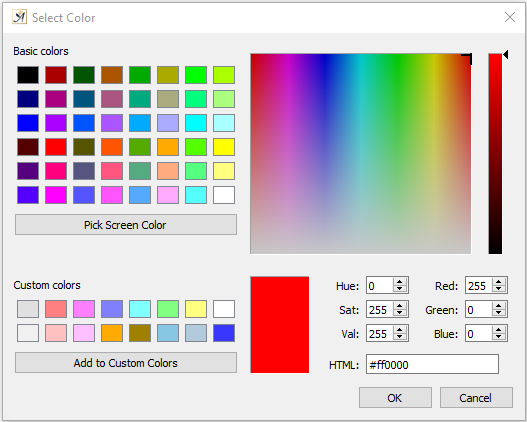
The Select Color dialog
Here you can choose a basic color in the color square (WIN), adjust the brightness for the end result, and see the colors selected for Red, Green and Blue (they can also be entered here). Options and modification possibilities depend on your operating system / computer.
Colors for the Whole Document, Text and Links
In the “HTML Colors” dialog (“Document” → “Document Properties…” → “Background/Colors”) you can set the colors for the following text options:
- The running text (“Default text color”)
- Hyperlinks (“Color for links”)
- Active hyperlinks (“Currently clicked links”)
- Already used hyperlinks (“Used links”)
- The background color (“Background color”)
- Links to your databases (“Text => DB Links”) such as “My Characters”
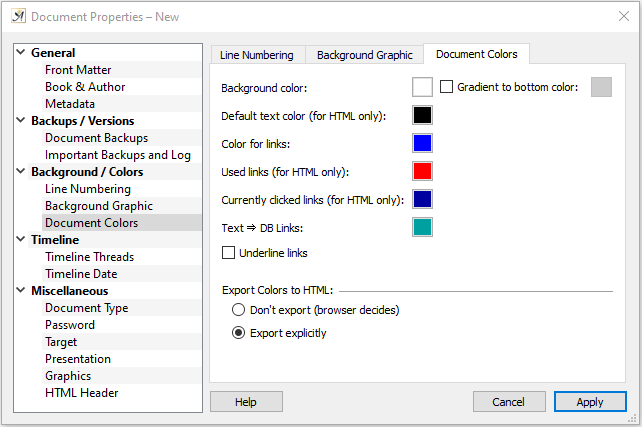
HTML color settings
These colors are only for the display on a monitor and will not be printed. The printed version will remain black and white (as long as you have not actually changed the text color, which is not related to these colors.)
If you find it easier to read, you can change the background color to something darker and use another color for the running text.
You can also decide in this dialog whether you would like to “ ![]() Underline Links.”
Underline Links.”
The radio buttons at the bottom of the dialog allow you to choose what will happen to your colors when you export in HTML: either “ ![]() Export explicitly” or “
Export explicitly” or “ ![]() Don’t export (browser decides).”
Don’t export (browser decides).”
 on March 30, 2020