
Table of Contents
The “Document” menu contains all the document settings for your current text. Universal settings, which are valid for all documents in Papyrus Author, can be accessed in “Preferences.”
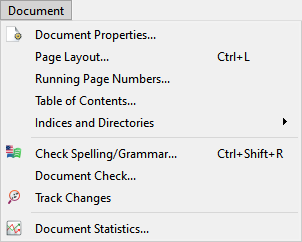
The “Document” main menu
“Document Properties…” contains all the settings relevant to your current document such as “Front Matter”, “Backups”, etc. See 1. Document Properties Dialog, below, for further information on these options.
“Page Layout…” opens a dialog in which you can access options relating to the page layout (including Margins and Paper Format) and numbering as wells as Footnotes and Master Pages.. See 2. Page Layout Sub-menu, below, for further information.
“Running Page Numbers…” lets you add page numbers to your document quickly and easily. There are options to place the numbers either in the header or the footer area, as well as left, centered, and right alignment options. A drop-down menu with various styles allows you to choose how the page numbers will look in your text.
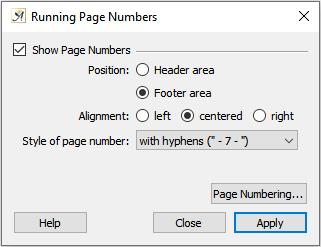
The dialog for easy page numbering
“Table of Contents…” contains all settings for your table of contents and allows you to create a table of contents as well as other directories.
“Indices and Directories” contains a sub-menu with options for “Index“, “Endnotes” and other links. See 3. Indices and Directories Sub-menu, below, for further information.
“Check Spelling/Grammar” opens a dialog that can be used to check for spelling and grammar mistakes.
The “Document Check…” will check if all your document’s hypertext links and labels are set correctly. Additionally, it will check the resolution of your graphics as per the field ‘Minimal resolution.’
“Track Changes” is useful for making changes (made by a proofreader or an editor) visible and allowing you to go back and accept or reject them.
The settings for revision tracking can be changed in “Preferences” → “Appearance” → “Revisions/Comments.” There is also an icon ![]() in the toolbar, with which you can turn revision tracking on and off.
in the toolbar, with which you can turn revision tracking on and off.

Revision tracking with deleted text
“Move to Next Change” allows you to easily step through changes in your document.
“Accept All Changes” and “Reject All Changes” gives you a one click option to accept or reject changes.
“Document Statistics” ![]() opens a dialog with statistical data (number of pages, paragraphs, lines, words, characters with and without spaces, etc.). There is also data for the fonts and style templates used in your text, as well as the pictures, which you can choose to convert to an external file here.
opens a dialog with statistical data (number of pages, paragraphs, lines, words, characters with and without spaces, etc.). There is also data for the fonts and style templates used in your text, as well as the pictures, which you can choose to convert to an external file here.
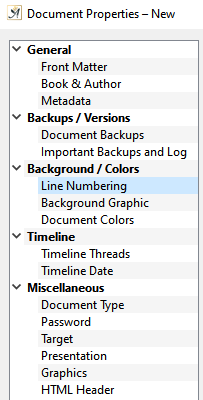
Document Properties Dialog
The “Front Matter” stores additional information about your document, as does the “Book Description” and the “Document Metadata,” which are also compatible with MS Word.
This information includes the author, title, publisher, etc.
Document Properties
“Document Backups” saves backup copies of your text, which we highly recommend for preventing unwanted data loss.
“Important Backups and Log” is closely related to the important backups. Here you can see and open all saved versions of your text, as well as create new backups and comment on backups already in the log.
“Line Numbering”can be used for several purposes – texts where the location of a text passage is needed, school texts, texts with line counting…
“Background Graphic” displays a graphic behind the main text, which will not appear when printed.
“Document Colors” changes the text colors and are not printed, such as the blue color that is used in document hyperlinks.
If you find it easier to work with, you can change the document text color from black to another color and even change the white document background. The colors you choose are important for exporting in HTML.
The “Timeline” dialogs give you control over the main threads of your story. This includes control over the time format, the start time of the story, the default duration of the chapters, and so on.
“Document Type…” opens a dialog, in which you can choose between a normal document, a template, and a form.
“Password” opens a dialog, in which you can encrypt your document to protect it from unwanted access. Here you will also find settings relating to how redacted text in your document will appear both on screen and when printed.
“Target” allows you to add a progress bar to the status bar at the bottom of your Papyrus Author window. This progress bar can be assigned a target and will then show you exactly how close you are to meeting your goal for the day and for the text in its entirety.
“Presentation” will open a new dialog in which you can change the display settings for a presentation mode, such as how your document will be displayed if it does not fit the screen 100%.
“Graphics” determines whether imported pictures will be stored in the document file or whether they will be saved in an external reference file.
“Page Layout” opens a dialog in which you can set the size of the Margins, Header and Footer area, as well as the number of Columns.

Page Layout
“Page Numbering” allows you to determine what page number your main text will begin on and how the table of contents will be numbered.
“Master Pages” will open a dialog, in which you can choose from a variety of master pages with various margins, header and footer areas, columns, and more. You can also create your own master page in this dialog.
“Assign Page Range” allows you to assign a specific page range to your master page.
The “Text Wrapping” dialog is where you can determine how many lines you would like kept together at the top and bottom of each page. These settings allow you to avoid unsightly “orphans” and “widows.”
“Footnotes” sets the numbering and the separating line for footnotes.
“Paper Format” is where you can set what type of paper you would like to work with. You can decide between a portrait or landscape orientation, and have the option to print special formats such as labels, envelopes, etc.
Indices and Directories
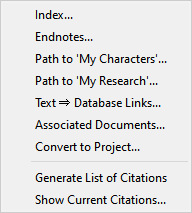
“Index…” is where you can create an index of all keywords at the end of your document.
“Endnotes…” allows you to create an endnote database and change its settings.
The character and research databases can also be accessed in this sub-menu. Each database has been devoted an in-depth article.
“Text => Database Links…” allows you to hyperlink spots in your text to a database entry. The links can then be opened in your text by clicking on them.
“Associated Documents…” are documents important for the document you are currently working on.
These could be normal Papyrus Author text documents that contain comments and notes about your main text. You can also choose if you would like the associated documents to open each time you open the main document, or whether you would only like them to appear in the favorites of the “File” menu.
A “Convert to Project…” is the combination of a main document with various “additional” documents, such as a Character Database, notes, etc., that can all be found in the same folder. This option is for converting a normal text document into a Project. If your document is already a Project, this option will appear grayed-out.
The option “Generate List of Citations” will open the research database linked to your text. Here you can set where and how your list will appear. Clicking on “Create Report” will generate the list of the citations.
“Show Current Citations…” will open the research database.
 on March 27, 2020