
Table of Contents
The area to the left of your main text is the “Navigator.” It’s an overview of your text organized into an outline of your chapters and scenes, so you always know where you are at and where you are headed.
The navigator can display a variety of information such as statistics, comments, and much more
Clicking on the compass icon ![]() in the lower-left corner of your window will allow you to see the Navigator to the left of your text.
in the lower-left corner of your window will allow you to see the Navigator to the left of your text.
Click on the compass again and it will be hidden.
You can also do this under the menu “Author.”
Hierarchical numbering in the Navigator. You can drag and drop the elements and the matching text will follow accordingly
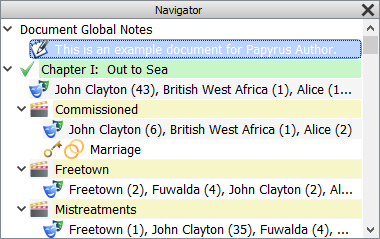
Your chapters and scenes are organized hierarchically into an outline according to their numbering. Sub-chapters are indented and can be expanded by clicking on [+] or hidden by clicking on [-] (depending on your system this could also be a triangle).
You can move chapters, scenes, and notes in the Navigator by dragging and dropping ![]() . The text belonging to these chapters, scenes, and notes will then be moved with them automatically.
. The text belonging to these chapters, scenes, and notes will then be moved with them automatically.
The width of the Navigator can be changed by moving the divider with your mouse.
Chapters, Scenes, and Key Events
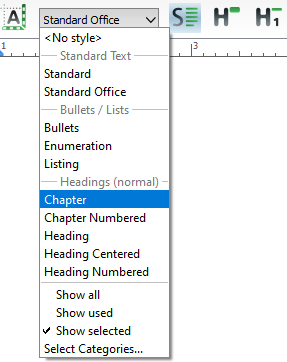
Change text into a heading in the drop-down menu for styles
Chapters are the areas of text that start with one heading and end with the next heading.
The Navigator in Papyrus Author can do a lot more though than simply organize your headings.
Creating “scenes” within your chapters can help subdividing your chapters into smaller pieces. Scenes are a special type of sub-chapter that are kept “secret” from your readers. They are created similar to creating a comment, but are handled like a sub-chapter. Thus, they each have a heading, but it can only be seen by the author. The reader will never notice that a heading even exists for this scene.
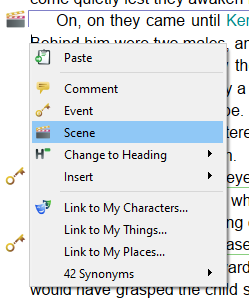
Create a scene in the context menu
The scene title, which is invisible to your reader, will be shown with a specially-colored comment box on the right edge of your document.
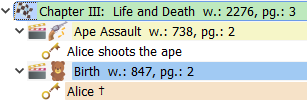
The scene will show up in the Navigator with a clapperboard icon ![]() .
.
How to create a scene? The quickest way is through the context menu. Right-click on the spot where you would like to place a scene title ![]() , and choose “Scene Title” (the first time you do this, you will find it in the context menu under “insert”). You can also use the menu “Insert.”
, and choose “Scene Title” (the first time you do this, you will find it in the context menu under “insert”). You can also use the menu “Insert.”
If you want to label text as an important event in your story, choose “Event.” In the “Timeline” window you can upgrade an event to a “ ![]() Key Event,” which is not only important in this chapter but for the entire story.
Key Event,” which is not only important in this chapter but for the entire story.
In the text, as well as the Navigator, an event will be shown with the gold key icon ![]() .
.
A “key event” is similarly important for your text, but represents a much smaller section of text. It’s an event you want to be able to see in your Navigator, but it is not a longer piece of text that continues until the next scene or end of the chapter.
The symbol for normal comment boxes is an orange comment box icon ![]() . Clicking on one of these boxes
. Clicking on one of these boxes ![]() in the Navigator will jump to that spot in the text where the comment can be found (or the key event or scene title). Double-clicking
in the Navigator will jump to that spot in the text where the comment can be found (or the key event or scene title). Double-clicking ![]() will set your cursor in the comment box so that you can edit it.
will set your cursor in the comment box so that you can edit it.
If you find the different colored comment boxes too distracting, you can choose to hide them in the status bar of the Navigator under “Navigator Display.”
You can assign a color to each entry in the Navigator. Simply right-click on the heading in the Navigator and choose the color in the context menu.
Headings can also be assigned a text style (bold, italics, and bold+italics).
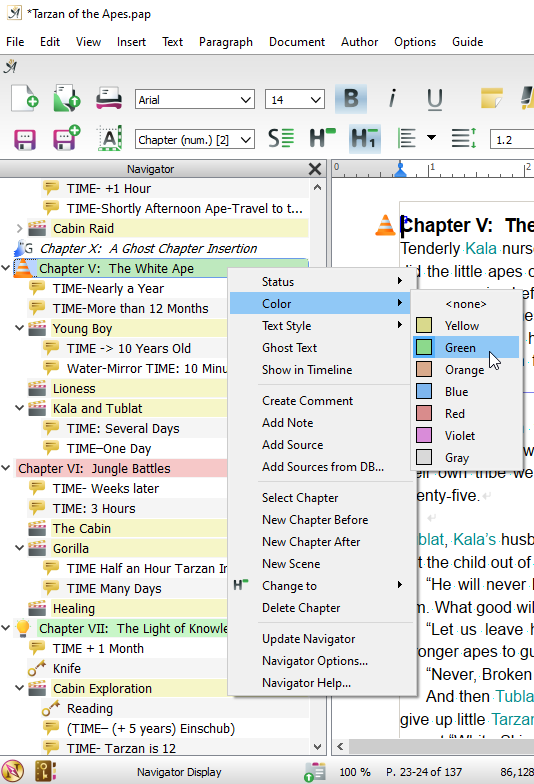
You can assign Navigator elements different colors and text styles
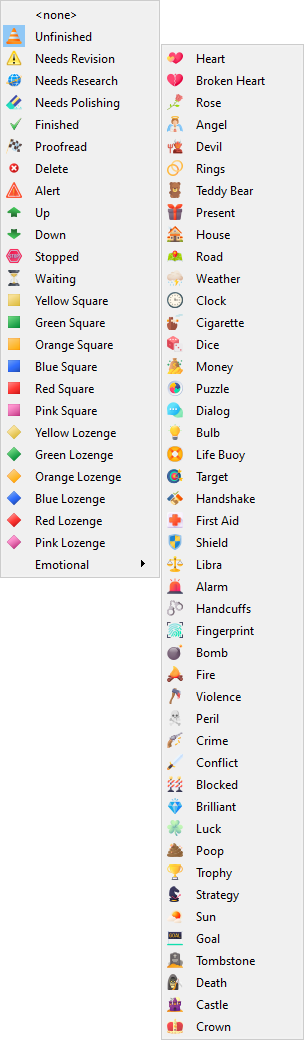
Navigator status icons
The Navigator also has status icons to help keep your text organized. Each heading in the Navigator can be assigned a status, which will be shown with a status icon.
You can label your headings as to be “deleted” ![]() , or if your texts “needs revising”
, or if your texts “needs revising” ![]() , if it “needs research”
, if it “needs research” ![]() , or if your rough draft still “needs polishing”
, or if your rough draft still “needs polishing” ![]() , if you have “stopped”
, if you have “stopped” ![]() working on this chapter for now, or if you are “waiting”
working on this chapter for now, or if you are “waiting” ![]() for something. When the chapter is finally finished, you can mark it as “finished”
for something. When the chapter is finally finished, you can mark it as “finished” ![]() or even “proofread”
or even “proofread” ![]() .
.
You can also choose icons for your own ideas, which we have provided in various forms and colors ( ![]()
![]()
![]()
![]()
![]()
![]() ).
).
Additionally, Papyrus Author offers a variety of “Emotional” status icons for your chapters and scenes.
With all of these options you should be able to clearly visualize in your Navigator what still needs to be done.
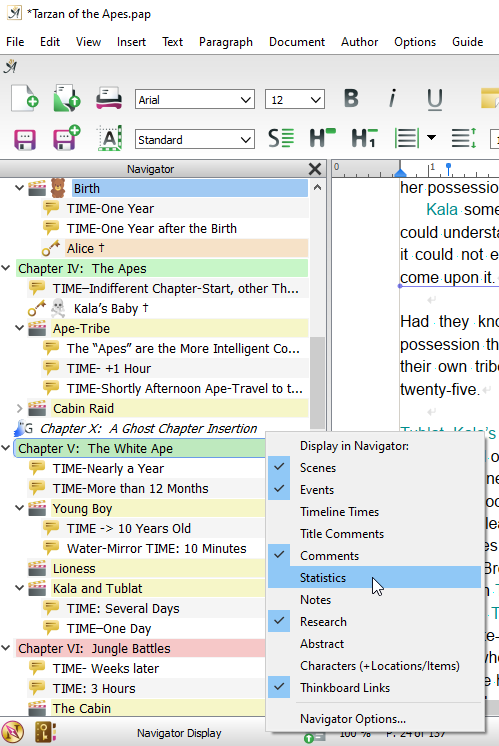
The “Navigator Display” dialog can be found directly under the Navigator in the status bar at the bottom of the window. This is where you can choose what information you would like to see in the “Navigator Display” in addition to the chapter headings by clicking with the mouse.
The following can be displayed in the Navigator:
![]() Scenes with scene titles will be treated just like a sub-chapter.
Scenes with scene titles will be treated just like a sub-chapter.
A scene consists of the entire text area from the beginning of a scene to the end of the chapter (or until the start of the next scene).
![]() Events are comments that identify a point in your text that is especially important for the story.
Events are comments that identify a point in your text that is especially important for the story.
![]() Timeline times show the beginning and ending of your chapters.
Timeline times show the beginning and ending of your chapters.
Text statistics in the Navigator
![]() Title Comments provide additional details about chapter headings.
Title Comments provide additional details about chapter headings.
![]() Comments (normal comments) give additional information about a specific spot in your text.
Comments (normal comments) give additional information about a specific spot in your text.
The Text statistics will show you the amount of text in each chapter and scene. In the Navigator settings you can find additional options for which statistics should be displayed and how these should be shown.
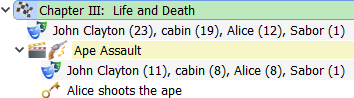
Character appearances in the Navigator
![]() When “Characters” appear in your story, they will also appear in the Navigator under the chapter heading followed by the number of times this character appears in your story. You can find additional settings for your characters in the “Navigator settings,” including which characters you would like to appear and which you would not like to see at all.
When “Characters” appear in your story, they will also appear in the Navigator under the chapter heading followed by the number of times this character appears in your story. You can find additional settings for your characters in the “Navigator settings,” including which characters you would like to appear and which you would not like to see at all.
For more information, please refer to the article regarding the Character Database.
![]() Notes for the entire document (universal notes, which appear at the top of the Navigator) and chapter notes can be created and edited in the “Notes” column at the bottom of the Navigator.
Notes for the entire document (universal notes, which appear at the top of the Navigator) and chapter notes can be created and edited in the “Notes” column at the bottom of the Navigator.
Clicking the Navigator Display bar will open display options
Character appearances in the Navigator
In the bottom of the Navigator you will find the info columns where you can store additional information for your chapter.
Here you will find lists for your “Notes,” “Abstracts”, your “Characters” with places and things, as well as the data for your “Research” and “Timeline.”
The size of the info column area can be changed by placing your mouse over the dividing line to the Navigator and moving it.
You can choose to ![]() show or
show or ![]() hide the entire info column area with the button on the status bar.
hide the entire info column area with the button on the status bar.
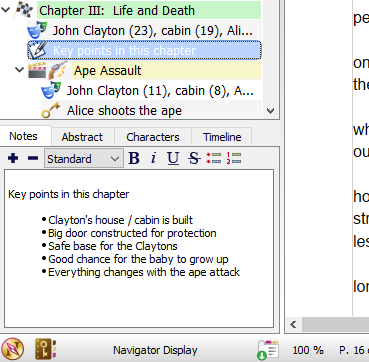
In the “Notes” column you can use the buttons ![]() and
and ![]() to create or delete notes. In the drop-down menu you can set the text size. You can also select the following text styles: Bold [B], italics [i], underline [U] and
to create or delete notes. In the drop-down menu you can set the text size. You can also select the following text styles: Bold [B], italics [i], underline [U] and strike through [S]. Additionally, you can choose to write a list with bullet points or numbers.
You can select which info categories you would like to use in the Navigator Display. The Navigator display settings can be found in the status bar at the bottom of the window.
Navigator display settings will be saved with the respective document, so you are free to set different categories for different documents.
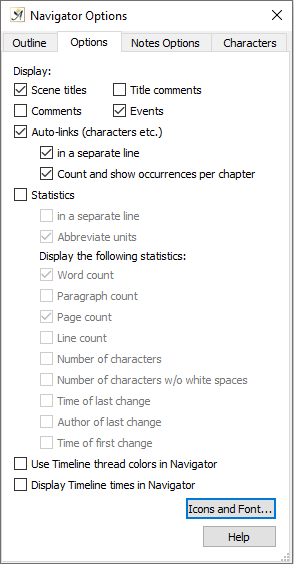
Navigator options in the Navigator display bar
Chapter Notes and Universal Notes for the Entire Document
An example note
Normally when you make a note ![]() it belongs to a certain chapter. But you can also create “universal notes” that belong to the entire document and not only a chapter.
it belongs to a certain chapter. But you can also create “universal notes” that belong to the entire document and not only a chapter.
“Notes” will not be visible in the main text. You can see your notes in the info column of the Navigator and you will also see a preview of the first line in the appropriate chapter of the Navigator.
For the notes to be shown in the Navigator, “Notes” must be enabled in the Navigator settings found in the Navigator display bar.
Universal notes will appear at the very top of the Navigator. If you have not yet added any universal notes, the heading “Document–Universal Notes” will not appear. The first time you add a universal note you need to go to the menu “Insert” and choose “universal note.” After doing this, the heading for universal notes will appear.
Notes can be moved by dragging and dropping. For example, you can move a universal note into a chapter or take a chapter note and move it into a different chapter.
 on November 24, 2020