
Table of Contents
The Pinboard for Notes and Text Snippets
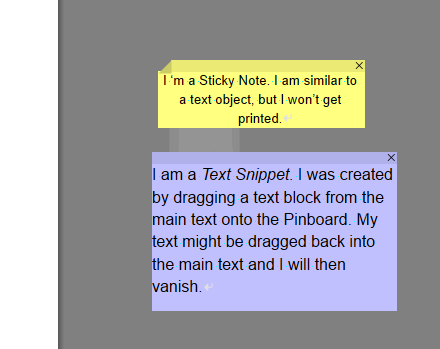
The Pinboard to the right of the text with a sticky note and a text snippet on it
The entire area to the right of the text is the Pinboard.
Here you “pin up” everything that you want to use later on: pictures, notes, and text snippets.
The text in your notes and text snippets are pieces of additional information that don’t belong to your actual text. They will be saved with your text, but won’t appear when printed.
Notes can be created directly on the Pinboard in the context menu.
They can also be created in your main text by clicking on these icons in the toolbar 

 .
.
A text snippet is created by selecting a part of your main text and dragging it onto the Pinboard. When you want to insert the snippet into your main text again, simply drag it back. The text snippet will then disappear.
Text snippets will automatically take on the text style of the sentences around them. It is also possible to move them with the original text style by holding down shift/alt when you drag and drop.
Under “Preferences” → “User Interface” for the Pinboard Area you can set what you would like to happen to the text in the Pinboard as a default ( ![]() Create text clippings in the Pinboard area as plain text (unformatted).
Create text clippings in the Pinboard area as plain text (unformatted).
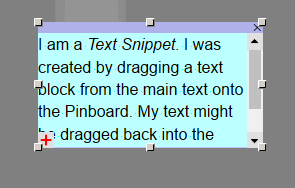
The little red cross suggests that there is more text in the snippet than is visible
If a piece of text in the Pinboard (text snippet or note) contains more text than visually fits, a red cross will show up in the bottom corner as well as a scrollbar. Clicking on the cross opens the text to its full length (as much as will fit in the Pinboard).
Double-clicking on the title bar of a text object in the Pinboard will close it. Then only a part of the first line will be visible followed by “+” to show that it is closed.
You can open up the text again by either clicking on the small cross “+” or by double-clicking on the title bar. The left side of the title bar will allow you to resize the text object in your Pinboard area.
Papyrus Author uses a special style template called “Pinboard,” which determines the text style of the text objects in the Pinboard. Most of the time you will want to display your Pinboard text in a smaller size than that of your main text.
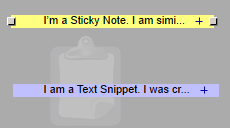
Again, part of the text content is cut off and can be unfolded with a click
Always keep in mind that Papyrus Author has features that other programs, for example MS Word, don’t offer.
When you save your text as a MS Word “doc,” Papyrus Author does all it can to make sure none of your formatting, etc. gets lost in the process.
However, the parts of your document that have been created with features that don’t exist in Word (Research, Character Database, and the Pinboard) cannot be transferred to Word.
Therefore it is advisable to save your work in the Papyrus Author “pap” format each time. Then, when you are completely finished, you can save it as a “doc.”
And don’t forget to save your “pap” versions in a safe spot!
Pinboard Settings for Width, Text Style, and Background Graphic
You can access the Pinboard settings in the “Preferences” → “User Interface” → “Pinboard Area.”
Normally, when a text snippet is dragged from your main text and dropped on the Pinboard, it will keep the text style it had in the main text.
If, however, you would like to insert the text snippets in other areas of your main document so that they conform to the text style in that spot, you can select the checkbox “ ![]() Create text clippings in the Pinboard area as plain text (unformatted)”.
Create text clippings in the Pinboard area as plain text (unformatted)”.
The Pinboard can also be assigned a background picture or color here. The file path for the default background graphic is: “(Papyrus Author)/Modules/Clipboard/*.*”.
Multiple Pinboards
You can have up to eight different Pinboards per document. There is a small tab for your Pinboards located next to the ruler bar.
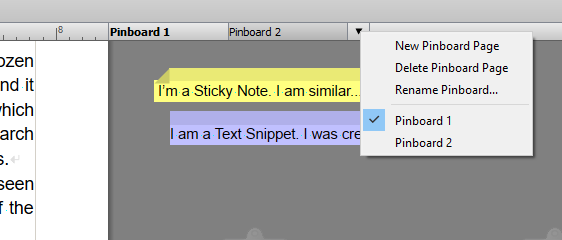
In this example, two Pinboards are assigned to this document and can be switched by clicking on the tabs
In the drop-down menu that appears when you click on the small triangle next to the Pinboard (or in the Pinboard context menu) you can create a new Pinboard as well as change the name of or delete an existing one.
When your choose to view your text in the middle (under the menu “View”) the Pinboard will appear both on the right and the left of your document. If you choose to view your text on the left, then the Pinboard will only appear on the right-hand side.
The file names for the background pictures in the Pinboard simply need to be numbered in ascending order. For example, if you have the background “Pinboard_1.png”, Papyrus Author will use “Pinboard_2.png” for your second Pinboard, and so on.
Sticky Notes
Sticky notes are a type of graphic object. They can be used to make notes in your text of any kind (as a reminder to edit later, for example) or for editing texts written by others. You can use them anywhere in your document.
After clicking on the sticky note button in the Toolbar, Papyrus Author will “stick” a note to the place in your text where you cursor is located. Sticky notes will not be printed. The look, color and other object properties of sticky notes are preset in a purposeful way.
You also have the option to determine how your sticky notes will appear yourself:
- Create a new sticky note.
- Set the Object Properties as you wish either by selecting the sticky note and using the context menu and choosing “Graphic Properties” or in the “Insert” main menu under “Graphics” → “Graphic Properties.”
- Choose the option “Preset” in the Object Properties dialog.
=> Now when you add a new sticky note, it will always appear with these settings.
There are six pre-set types of sticky notes in various colors that you can choose from. You can change which type appears in “Preferences” in the Toolbar Icons dialog.
We have picked the yellow sticky note as a pre-set when you first open Papyrus Author.
The colors of the sticky notes can be changed in the “Notes/Highlighters” dialog (found in “Preferences” under “Appearance”).
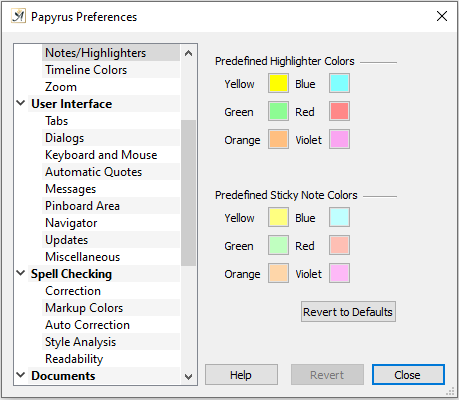
The Sticky/Highlighter Colors dialog for changing the color of highlighters and sticky notes
Global Notes
Global notes
The Notes document is meant to be a global pool for your thoughts, ideas and necessary reminders.
You can access it from every document in Papyrus Author, which makes it easy to store more or less important texts across your work space. It is not bound to specific documents and cannot be manipulated. This protects you from accidentally deleting it and ensures that you can always find it later.
“Notes…” in the “File” menu will open the Papyrus Author Notepad, which offers this easy way to save your ideas on the fly. You can also enable the Icon ![]() for your Toolbar to make it accessible via one mouse click.
for your Toolbar to make it accessible via one mouse click.
 on March 31, 2020