
Table of Contents
The “Insert” menu is where you can find special characters and symbols, as well as a variety of options to insert into your text.
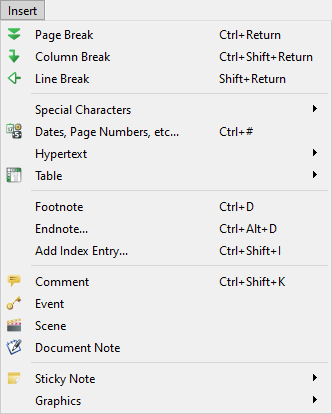
The “Insert” main menu
“Page Break” ![]() creates a break which will start a new page.
creates a break which will start a new page.
A page break can also be inserted with the shortcut ![]() +
+ ![]() (Win) or
(Win) or ![]() +
+ ![]() (Mac).
(Mac).
“Column Break” is similar to a page break, but is used for columns. If your page has more than one column, inserting a column break will create a break in the column where you cursor is located and start any text after that on the following page. If your text only has one column (= the main text area), inserting a column break will be exactly the same as inserting a page break.
The shortcut keys for a column break are ![]() +
+ ![]() (Win) or
(Win) or ![]() +
+ ![]() (Mac).
(Mac).
“Line Break” will insert a “soft return.” Unlike a “hard return,” which can be inserted by hitting the Return ![]() key and which starts a whole new paragraph, a soft return will bring the following text onto the next line, without starting a new paragraph.
key and which starts a whole new paragraph, a soft return will bring the following text onto the next line, without starting a new paragraph.
A soft return to force a new line
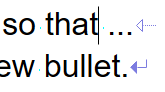
This is useful if you want to start a new line while working in a bullet list, without generating a new bullet. The new line will also be appropriately indented when you use a soft return:
- At the end of this line a soft return has been inserted so that …… the text can continue on a new line without inserting a new bullet.
The “Special Characters” sub-menu offers a variety of regularly used characters. See 1. “Insert” → Sub-menu “Special Characters,” below.
The next option on the “Insert” menu will open the dialog that contains the placeholders for “Date, Page Number, etc.” (“etc.” here meaning various forms of the date as well as the document name).
The “Hypertext” sub-menu gives you access to the functionality to create hyperlinks within your text. See 2. “Insert” → Sub-menu “Hypertext”, below.
The “Table” sub-menu allows you to create, design and calculate with tables directly in your text.
“Footnote” will jump to the end of the page and allows you to enter a footnote. You can get back to the main text either by clicking on “footnote” again or with the key combination ![]() +
+ ![]() . Settings for footnotes can be found in the “Footnotes” dialog, in the “Document” menu under “Page Layout.”
. Settings for footnotes can be found in the “Footnotes” dialog, in the “Document” menu under “Page Layout.”
“Endnote…” will create an endnote, which is used in addition to footnotes; the two operate independently. The content of your endnote is determined by a database which you have assigned to your document.
Be aware that you cannot change an endnote into a footnote and vice versa.
“Add Index Entry…” will open the dialog to generate an index or add a keyword. You can insert a word directly in the index by entering it into the “Index Entry:” field.
“Comment,” “Event,” and “Scene” are special types of notes that appear in the margins within their own boxes.
A “Document Note” will be saved in the Navigator, but will not appear in the main text.
“Sticky Note” creates a colored note which will not be printed. You can use them directly in the text as well as in the Pinboard.
The “Graphics” sub-menu offers you to create several types of graphic objects. See 3. “Insert” → Sub-menu “Graphics”, below.
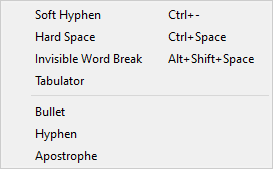
“Special Characters” → “Soft Hyphen” will insert an invisible syllable break in your word. Soft hyphens will take priority over the automatic syllable breaks when you justify your text. Even when your word fits on a line completely, the soft hyphen will remain in the word, but will be invisible. If your text shifts and the word now lands at the end of a line, the soft hyphen will tell Papyrus Author where you would like it to be split.
“Special Characters” → “Hard Space” will insert a space belonging to the word; this space will remain intact even when selecting the word with your mouse. It will also not be separated from the word or changed in size when using justified spacing.
Special characters
“Special Characters” → “Invisible Word Break” is used for certain languages that don’t use spaces (Thai, for example).
This type of word break will insert a space, but one with a width of zero. This tells Papyrus Author where to make a line break and allows you to more easily select one word at a time. The invisible word break will appear in your text as a blue, vertical line.
“Special Characters” → “Bullet” lets you create a bulleted list.
Bulleted lists can also be made with the style template “Bullets,” which can be found in the toolbar by the icon ![]() . A single bullet cannot be entered with a keystroke, which is why we have added it to the “Special Characters” menu.
. A single bullet cannot be entered with a keystroke, which is why we have added it to the “Special Characters” menu.
“Special Characters” → “Hyphen” is used to set off parts of a sentence. The dash (–) is not to be confused with the hyphen (-), which has its own key on the keyboard. With the default Papyrus Author text macros, you can create a dash by typing “ – ” (space, minus, space).
»Special Characters« → »Apostrophe«: Papyrus Author has a special automatism to always create the appropriate quotes (see “Preferences” → “User Interface” → “Automatic Quotes”). This menu call is for inserting just a normal apostrophe into your text.
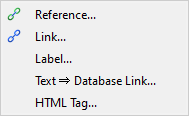
Hypertext options
Under “Reference…” you can create a link to another spot in your document. For example, a heading, picture, table cell. This is created with a label. You can create or modify labels in the dialog “Label…“
With “Link” you can create a link to another document or to an internet address. You can also link to another place in your text.
The “Text => Database Link” allows you to link a spot in your text to a record in a Papyrus Author Database (“Document” → “Indices and Directories” → “Text => Database Links”).
“HTML Tag…” will open a dialog in which you can insert and edit HTML tags that Papyrus Author is not familiar with.
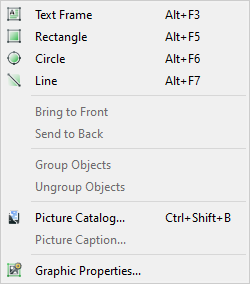
The “Graphics” sub-menu
This sub-menu offers the option to create graphic objects such as a “Text Frame,” “Rectangle,” “Circle,” and “Line.”
If they are overlapping, you can change their order and “Bring to Front” or “Send to Back.”
You can “Group Objects” so that they are handled as one object as well “Ungroup Objects.”
The “Picture Catalog…” displays a list of all the pictures belonging to your document.
“Picture Caption…” allows you to add a caption to your picture via a text object that uses a specific “Style”.
In the “Graphic Properties” dialog you can change the settings for text objects, Sticky Notes, Text Snippets and pictures.
This dialog contains options for the selected graphic object: “Color…,” “Fill Pattern…,” “Line,” “Dimensions,” “Anchor,” “Text Wrap,” “Picture Size,”” E-book/HTML” and “Form.”
These graphic object properties can also be accessed in the context menu by right clicking on any graphic object.
Papyrus Author makes moving and resizing your graphic objects and pictures easier with its magnetic guidelines, which you can simply drag out of the vertical and horizontal rulers with your mouse. They allow you to line up your graphic objects precisely.
 on March 27, 2020