
Table of Contents
The “text style” determines how the characters will look in your text. The first part of text style is the font, for example “Arial” or “Times.” You can easily change the font in Papyrus Author with one click in the toolbar.

Fonts with and without serifs
In “Arial,” the characters are clear and don’t contain serifs. “Times,” on the other hand, has serifs. When the printing quality is high, serifs make the font easier to read.
Additionally, the look of the text is determined by other elements such as the thickness (“bold” or “normal”) or a slant to the letters (“italics”).
You can name specific text styles and save them as a “Style“ template. This allows you to easily access and use them again, which gives your text a uniform appearance. Together, the text style and paragraph formatting determine how your text will look.
Adjusting Text Style (Bold, Italics, Underlined…)
The text style settings are found in the Toolbar as well as in the dialog “Font,” located in the menu “Text.” In the toolbar, you will find the drop-down menus ![]() to set the font and the size as well as the three buttons for the text styles bold, italics, and underline (
to set the font and the size as well as the three buttons for the text styles bold, italics, and underline ( ![]()
![]()
![]() ).
).
There are also buttons for superscript ![]() and subscript
and subscript ![]() , for working with a table or anything else math-related.
, for working with a table or anything else math-related.
The colors for your text (or graphic object) can be changed in the Color dialog![]() .
.
In the menu “Text” are additional text effects located, such as “small caps.” You will also find the settings for “spacing” as well as the Positioning of the characters (under “Microspacing”).
You have a wide variety of text styles to choose from in the dialog “Character Set” (located under “Text”).
The “Copy Text Attributes” Icon ![]() allows you to copy all the text settings (font, size, styles such as bold, italics, etc.).
allows you to copy all the text settings (font, size, styles such as bold, italics, etc.).
Then, with the button “Apply Text Attributes” ![]() you can apply these text settings to a new spot in your text, or place your cursor in your text and use them to continue writing.
you can apply these text settings to a new spot in your text, or place your cursor in your text and use them to continue writing.
You can also choose to combine these two icons into one ![]() , which is called the “magic brush.” With this icon you can save text settings with the first click and apply them with the second. But only once. We recommend using the two icons
, which is called the “magic brush.” With this icon you can save text settings with the first click and apply them with the second. But only once. We recommend using the two icons ![]() and
and ![]() to work more efficiently.
to work more efficiently.
Spacing (Between Characters or Words)
In the “Spacing” dialog (under the Text menu) you can change the spacing between characters in a word.
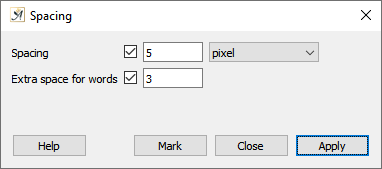
The Spacing dialog
There is also an option to add extra space for words, which sets the space between words and works independently of the first “spacing” setting for the space between characters.
The spacing increments in the “ ![]() Spacing” and “
Spacing” and “ ![]() Extra space for words” fields can be changed in the drop-down menu. There are options for pixels, printer pixels, or millimeters.
Extra space for words” fields can be changed in the drop-down menu. There are options for pixels, printer pixels, or millimeters.
The “activate” buttons ( ![]() ) give you the choice to apply only one of the two options to your text, either only for the spaces between characters (only “spacing” selected) or only the spaces between words (only “extra space for words” selected).
) give you the choice to apply only one of the two options to your text, either only for the spaces between characters (only “spacing” selected) or only the spaces between words (only “extra space for words” selected).
The ![]() button allows you to select discontinuous blocks of text and then change the parameters for the selected parts only in this dialog.
button allows you to select discontinuous blocks of text and then change the parameters for the selected parts only in this dialog.
Microspacing
Microspacing allows you to move your text cursor vertically or horizontally in micro increments.
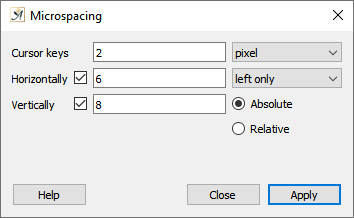
The Microspacing dialog
You can move your text either by selecting the text and then using the command ![]() +
+ ![]() +
+ ![]() /
/ ![]() /
/ ![]() /
/ ![]() (Mac & Win), or by using the “Microspacing” dialog (in the “Text” menu) directly.
(Mac & Win), or by using the “Microspacing” dialog (in the “Text” menu) directly.
Microspacing can also be used to move Papyrus Author’s movable text objects (snippets and notes). You could arrange parts of a formula like this with text objects.
The “cursor keys” field is where you can enter the width of each increment; the drop-down menu next to it offers options for the type of increment: pixels, printer pixels, or millimeters.
The “horizontal” and “vertical” movement can also be set in this dialog. If you would like to only work with one or the other, simply deselect one of the ![]() “activate” buttons. Only the options you have selected will be changed when you click
“activate” buttons. Only the options you have selected will be changed when you click ![]() (or
(or ![]() ).
).
There is a drop-down menu next to the “horizontal” movement that determines the direction of movement: choosing “left only” means that the block of text to be moved lies left of the cursor, “right and left” includes the text to the right as well. (If you are not getting the results you want with this dialog, try simply playing around with the options.)
If you have selected “absolute,” the movement will be calculated from the basis text line; “relative” will calculate the micro-increments from your current cursor position.
 on March 31, 2020