
Table of Contents
Importing Data from other Databases
If you have formatted your database so that it contains all the necessary data fields to import data from another database, then you can use the “Database Import” dialog to import data from an ASCII export, a dBase file, a 1st Base file or from another Papyrus Author database.
Open the “Database Import” dialog from “File” → “Import…”
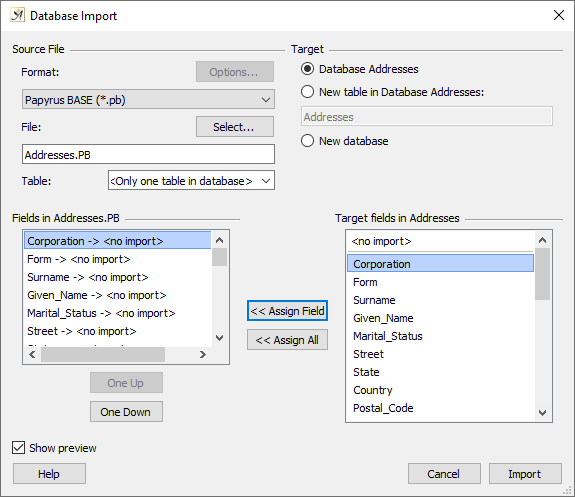
The Database Import dialog
In the top left of this dialog you can select your “Source File” with the file selection dialog that appears when you click on the “Select…” button.
In the drop-down menu “Format” you can choose from a variety of database formats that you can use for the import. The following describes an ASCII file import, but the same principles apply for other database formats that you would like to import.
First, it is important to take a look at the “ASCII Import Preferences for …” dialog and make sure that the field separator, record separator, and the encoding settings (especially important if you are exchanging data with another operating system) are correct. If you have selected the checkbox “ ![]() Show Preview,” you will be shown a preview of how your data would appear if you were to import it.
Show Preview,” you will be shown a preview of how your data would appear if you were to import it.
You will see on the left side of the “Database Import” dialog under “Fields in import file” how many columns (data fields) you document has.
For dBase or Papyrus Author database files you can choose under “Table” which tables of the database file to import.
In the upper-right corner of the dialog under “Target,” you can choose where you would like to import the file. Papyrus Author assumes that you would like to import it into the current database, but you can also choose to import it into a new table in your current database or you can generate a completely new database. If you choose this last option, you can decide for each field what name should be applied for the import (this can vary from the name in the source document).
Now you can assign each data field (column) in the import file to a field in your database using the “<< Assign Field” button. Data fields in the Papyrus Author database column that have already been assigned will appear with an asterisk “*” in front of them.
Data fields in your import document that you don’t want to import can simply be left unassigned. If you have made a mistake and have assigned a certain field to the left that you shouldn’t have, simply assign it to the “<no import>” entry.
If the number and order of all the data fields on the left and the right match up completely, you can simply use the “<< Assign All” button. If you want to change the order of your data fields, so that, for example, “First Name” and “Last Name” are aligned together, you can do this with the “One Up” and “One Down” buttons.
ASCII Import Options
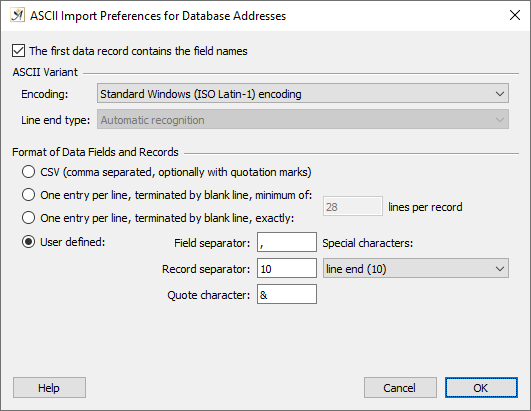
ASCII Import Preferences
When you are importing ASCII files, the “Options…” button in the “Database Import” dialog is important.
In the “ASCII Import Preferences for…” dialog you can set what type of file you are importing and what type of field separator and record separator (comma, line end, etc.)you want to use. The type of encoding your import document uses determines how special characters are coded.
Under “Format of Data Fields and Records” you have “User defined” options. The “Quote Character” is used for instances when you want to use a character that is assigned as a field separator in one of your records. If, for example, you use a comma in the data field text and then imported or exported it, it would be incorrectly interpreted as a field separator instead of a text character (assuming the field separator is set as a comma).
If, however, you put the comma in the quote character (normally, quotation marks are used “ ”) it works how you intended it to. When you import, the program doing the import will understand that the content inside the quotation marks is to be read as data field content text and not as any type of separator.
Exporting Data from a Papyrus Author Database
If you want to export your data from a Papyrus Author database, you can do so in a dialog using the “Export…” option, located in the database menu “File.” Exporting can be useful if you want to use data you have created in Papyrus Author in another program or if you want to create a new database in Papyrus Author itself.
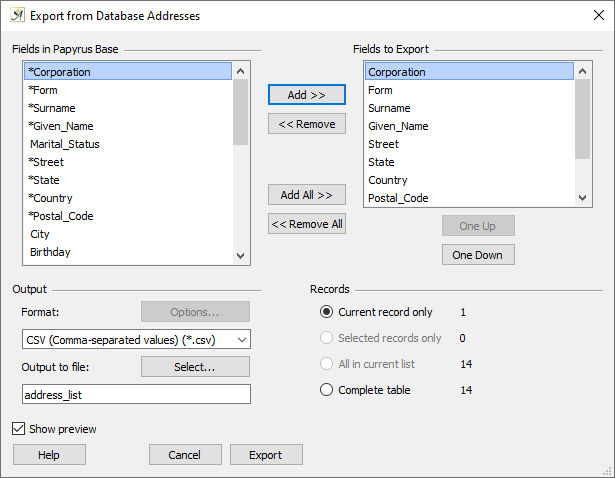
Exporting Database fields
In the bottom left of the dialog under “Output“, you have options to set which “Format:” you would like to export your data in and what you would like to call your export file (“Output to file:”). The “Select” button allows you to select an already existing file to export to.
The “Options” button will open the “ASCII Export Options” dialog, in which you can determine what type of field and record separator you want to use as well as set the type of encoding (for more see the description of the “ASCII Import Options” sub-section, above).
In the upper left you will find the list “Fields in Papyrus Base” which contains all the fields in your database that are available for export. With the “Add >>” button you can move fields from the left list to the right “Fields to Export” list. There is also a “<< Remove” button and buttons to “Add All >>” and “<< Remove All.” Fields you have selected to export will then appear in the left list with an asterisk in front of them.
The order of the data fields used for exports is determined by the right list; if you would like to change the order, you can use the “One Up” and “One Down” buttons.
In the “Records” section on the bottom right you can also set which records you would like to appear in the export file: You can export:
The “ ![]() Complete table.”
Complete table.”
“ ![]() All in current list” which are those records that are currently shown in the main table window.
All in current list” which are those records that are currently shown in the main table window.
The “ ![]() Selected records only” or “
Selected records only” or “ ![]() Current record only”
Current record only”
 on March 31, 2020