
Table of Contents
- 1 Keyboard and Mouse Settings
- 2 List of Keyboard Shortcuts
- 2.1 Shortcuts: Text Edit (Windows)
- 2.2 Shortcuts: Text Edit (Mac OS X)
- 2.3 Shortcuts: Block Operations (Windows)
- 2.4 Shortcuts: Block Operations (Mac OS X)
- 2.5 Miscellaneous Shortcuts (Windows)
- 2.6 Miscellaneous Shortcuts (Mac OS X)
- 2.7 Shortcuts in Papyrus Base (Windows)
- 2.8 Shortcuts in Papyrus Base (Mac OS X)
Keyboard shortcuts are a quick way to enter commonly used commands with your keyboard.
You can create keyboard shortcuts for options in the main menus and for text operations In the “Papyrus Keys” dialog under “Options” → “Keyboard Shortcuts…” Here you also can see and change the preset keyboard shortcuts that come with Papyrus Author.
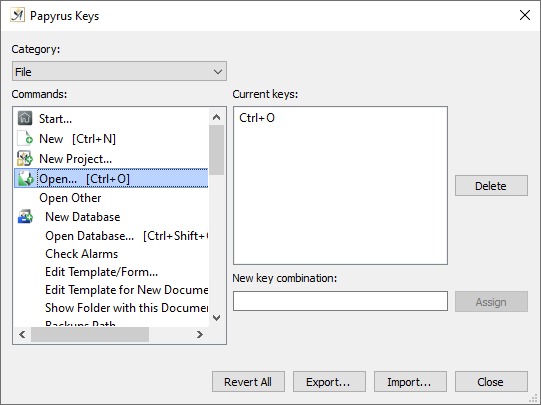
You can see and edit all keyboard shortcuts in the “Papyrus Keys” dialog
The shortcuts are divided into the following categories:
- Papyrus Author main menus (File, Edit, Insert, …)
- Special text operations that do not have their own entry in a main menu
- Style templates
- Main menus in the Papyrus Base database (File, Edit, Database, …).
Some menu items have been assigned more than one shortcut (used when, for example, the user expects a certain shortcut also used in MS Word to work in Papyrus Author).
User-defined shortcuts will be shown with a “>” before them in the list.
A shortcut that comes predefined in Papyrus Author, but which you have assigned to another command will be shown in brackets.
Keyboard and Mouse Settings
In Papyrus Author “Preferences” → “User Interface” → “Keyboard and Mouse” you can access display settings for keyboard shortcuts, the mouse pointer and other settings.
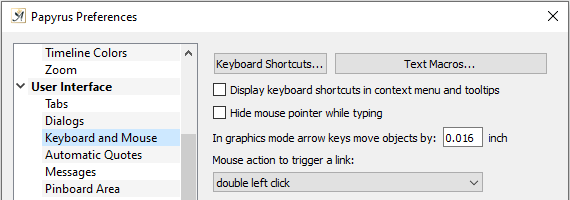
Display settings for the mouse, keyboard shortcuts and more
“ ![]() Display keyboard shortcuts in context menu and tooltips” will display the commands linked with shortcuts not only in the menu, but everywhere.
Display keyboard shortcuts in context menu and tooltips” will display the commands linked with shortcuts not only in the menu, but everywhere.
You can also set how far a graphic object should be moved with your arrow keys.
There is an option to “Hide mouse pointer while typing”, if you find it bothersome.
Furthermore, you can decide whether you would like hyperlinks to be opened with a single click or with a double click.
There are also buttons that will open the dialogs for keyboard shortcuts and text macros.
List of Keyboard Shortcuts
All of the following keyboard shortcuts can be redefined if you want. The following list contains the default settings.
The shortcuts are sorted by the following criteria:
- Text Edit (Win)
- Text Edit (Mac)
- Block Operations (Win)
- Block Operations (Mac)
- Miscellaneous (Win)
- Miscellaneous (Mac)
- “Papyrus Base” Shortcuts (Win)
- “Papyrus Base” Shortcuts (Mac)
The shortcuts for the menu commands can be found in each menu list.

The shortcuts are displayed in the menus
Then there are the special keys, shown here in plain text:
The ![]() Tabs create more space on a line.
Tabs create more space on a line.
![]() Backspace deletes a character to the left.
Backspace deletes a character to the left.
![]() CR = Carriage Return = Return creates a new line.
CR = Carriage Return = Return creates a new line.
![]() –The Apple command key works, for the most part, like the
–The Apple command key works, for the most part, like the ![]() key in Windows.
key in Windows. ![]() –The Apple control key works for other functions in Mac.
–The Apple control key works for other functions in Mac.
Shortcuts: Text Edit (Windows)
| Shortcut: | Command: |
| Move cursor one place right / left/ line up / line down | |
| Move cursor one word right / left (to start of word) | |
| Move cursor to line start / line end | |
| Jump one page on monitor up / down | |
| Jump one text page up / down | |
| Cursor jump to document start / end | |
|
|
Move cursor / selected text blocs in micro-increments (Microspacing) |
| Jump to text mark 1 (to 6) | |
| Delete a character or text block to the left / to the right | |
| Delete from text cursor a word part or entire word to the left / right | |
| Delete a line and copy it to the clipboard | |
| Manual word break with priority for hyphenation | |
| Set text mark 1 (to 6) | |
| Hard line break (or paragraph break) | |
| Soft line break (within a paragraph) | |
| Hard, manual page break | |
| Hard, manual column break (necessary for multiple columns) | |
| Hard space | |
| Add word to index | |
| First letter uppercase, rest lowercase, for block selections, all uppercase | |
| First letter and rest lowercase | |
| Exchange characters left ↔ right of text cursor | |
| Exchange words / blocks left and right of cursor |
Shortcuts: Text Edit (Mac OS X)
| Shortcut: | Command: |
| Move cursor one place right | |
| Move cursor one place left | |
| Move cursor one word right (to start of word) | |
| Move cursor one word left (to start of word) | |
| Move cursor to line start | |
| Move cursor to line end | |
| Jump one page on monitor up | |
| Jump one page on monitor down | |
| Jump one text page up | |
| Jump one text page down | |
| Cursor jump to document start | |
| Cursor jump to document end | |
| Manual word break with priority for hyphenation | |
| Set text mark 1 (to 6) | |
| Jump to text mark 1 (to 6) | |
|
|
Move cursor in micro-increments (Microspacing) |
| Delete a character or text block to the left | |
| Delete a character or text block to the right | |
| Delete from cursor a word part or entire word to the right | |
| Delete from cursor a word part or entire word to the left | |
| Delete a line and copy it to the clipboard | |
| Hard line break (or paragraph break) | |
| Soft line break (within a paragraph) | |
| Hard, manual page break | |
| Hard, manual column break | |
| Hard space | |
| First letter uppercase, rest lowercase, for block selections, all uppercase | |
| First letter and rest lowercase | |
| Exchange characters left ↔ right of text cursor | |
| Exchange words / blocks left and right of cursor |
Shortcuts: Block Operations (Windows)
Any type of selection in the direction of an already-selected block will deselect the block by the appropriate entity.
| Shortcut: | Command: |
| Block select a character to the right | |
| Block select a character to the left | |
| Block select a character to the right | |
|
|
Block select a character to the left |
| Block select everything in line from text cursor to the left /right | |
| Block select paragraph | |
| Block select page (or column in a page with multiple columns) | |
| Set block start / end | |
| Delete block selection | |
| Select block from text cursor to spot clicked with mouse / continues already-selected block to spot clicked with mouse | |
| Block select entire document (text mode) / select all objects in document (graphic mode) | |
|
|
Move selected block in microspacing |
| Select multiple table fields discontinuously | |
|
|
Move sentence forwards / backwards |
| Move paragraph forwards / backwards | |
| Cut block (moves to the clipboard) | |
| Copy block (moves to clipboard) | |
| Paste block (from clipboard) |
Shortcuts: Block Operations (Mac OS X)
Any type of selection in the direction of an already-selected block will deselect the block by the appropriate entity.
| Shortcut: | Command: |
| Block select a character to the right | |
| Block select a character to the left | |
| Block select a character to the right | |
| Block select a character to the left | |
| Block select everything in line from cursor to the left | |
| Block select everything in line from cursor to the right | |
| Block select paragraph | |
| Block select page (or column in a page with multiple columns) | |
| Set block start | |
| Set block end | |
| Delete block selection | |
| Select block from cursor to spot clicked with mouse / continues already-selected block to spot clicked with mouse | |
| Block select entire document (text mode) / select all objects in document (graphic mode) | |
|
|
Move selected block in microspacing |
| Select multiple table fields discontinuously | |
|
|
Move sentence forwards / backwards |
| Move paragraph forwards / backwards | |
| Cut block (moves to the clipboard) | |
| Copy block (moves to clipboard) | |
| Paste block (from clipboard) |
Miscellaneous Shortcuts (Windows)
| Shortcut: | Command: |
| Select zoom level from the predefined levels of “Zoom” dialog | |
| Zoom level “Printer Resolution” (also: |
|
| Zoom level “Whole Page” (also: |
|
| Open “Paragraph Style Template” dialog | |
| Open “Go to Page” dialog | |
| Held during program start: Papyrus Author will start without opening any documents | |
| Resizing and Moving Graphic Objects | |
| Turn on graphic mode | |
| Double-click on text | Turn off graphic mode and switch back to text mode |
| The diagonal “handles” on a graphic object change the size proportionally. The width-height ratio will not change. | |
| Change line length only vertically or horizontally, crooked angles are purposely avoided | |
| Move a graphic object in graphic mode the distance set under “Preferences” → “Toolbar” | |
| In graphic mode: page through stacked graphic objects like playing cards and activates each in turn | |
| In graphic mode: multiple selection of various graphic objects | |
| Resizing and Moving Tables, Lines, and Fields | |
| In graphic mode: select single line pieces (multiple selection possible) or, if table fields are already selected, continue selecting complete table fields of your choice | |
| In graphic mode: select multiple entire table lines | |
| Insert a new line in a table under the cursor | |
|
|
Insert a new line in a table above the cursor |
| Split a table and insert a new text line | |
Miscellaneous Shortcuts (Mac OS X)
| Shortcut: | Command: |
|
|
Enlarge zoom level (= |
| Reduce zoom level (only the “-” from the numeric keypad) | |
| Zoom 100% | |
|
|
Zoom printer resolution (only the “.” from the numeric keypad) |
| Open “Paragraph Style Template” dialog | |
| Open “Go to Page” dialog | |
| Held during program start: Papyrus Author will start without opening any documents | |
| Resizing and Moving Graphic Objects | |
| Turn on graphic mode | |
| Double-click on text | Turn off graphic mode and switch back to text mode |
| The diagonal “handles” on a graphic object change the size proportionally. The width-height ratio will not change. | |
| Change line length only vertically or horizontally, crooked angles are purposely avoided | |
| Move a graphic object in graphic mode the distance set under “Preferences” → “Toolbar” | |
| In graphic mode: page through stacked graphic objects like playing cards and activates each in turn | |
| + mouse click | In graphic mode: multiple selection of various graphic objects |
| Resizing and Moving Tables, Lines and Fields | |
| In graphic mode: select single line pieces (multiple selection possible) or, if table fields are already selected, continue selecting complete table fields of your choice | |
| In graphic mode: select multiple entire table lines | |
| Insert a new line in a table under the cursor | |
|
|
Insert a new line in a table above the cursor |
| Split a table and insert a new text line | |
Shortcuts in Papyrus Base (Windows)
| Shortcut: | Command: |
| In a Papyrus Base database table, the “focused” record is the one surrounded by a broken line. | |
| New record | |
| Select all records | |
| Extended search | |
| Select the focused record | |
| Open the focused record | |
| Open the table with the given number belonging to the current database (see drop-down menu “Table”) | |
| Show all records and deselect all selected areas | |
| Page through table | |
| Delete record (with confirmation prompt) | |
| In Papyrus Base entry form (database mask) | |
Delete data field (undo with  icon) icon) |
|
| New record | |
| Open report dialog | |
|
|
Page forward / backward one record |
| Jump to first record | |
| Jump to last record | |
| Confirm / save record, when not working with a multi-line field (for these, go to next line in field) | |
| Confirm / save record and go to next | |
| Block operations | Work like in Papyrus Author, especially text block drag & drop operations with the mouse |
Shortcuts in Papyrus Base (Mac OS X)
| Shortcut: | Command: |
| In a Papyrus Base database table, the “focused” record is the one surrounded by a broken line. | |
| New record | |
| Select all records | |
| Extended search | |
| + | Select the focused record |
| Open the focused record | |
| Open the table with the given number belonging to the current database (see drop-down menu “Table”) | |
| Show all records and deselect all selected areas | |
| Page through table | |
| Delete record (with confirmation prompt) | |
| In Papyrus Base entry form (database mask) | |
| Delete data field (undo with icon) |
|
| New record | |
| Open report dialog | |
|
|
Page forward / backward one record |
| Jump to first record | |
| Jump to last record | |
| Confirm / save record, when not working with a multi-line field (for these, go to next line in field) | |
| Confirm / save record and go to next | |
| Block operations | Work like in Papyrus Author, especially text block drag & drop operations with the mouse |
 on March 26, 2020