
Table of Contents
You can access all settings for printing under the “File” menu → “Print…” or with the shortcut Ctrl+P.
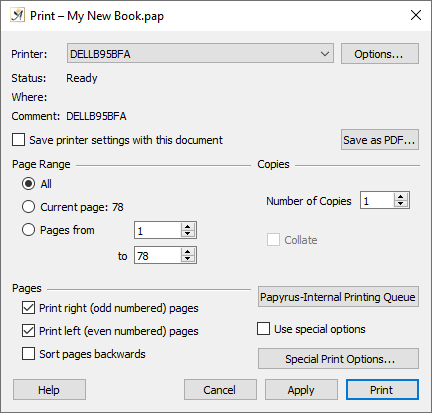
The Print dialog
In this “Print” dialog you can choose your print options, and, when you hit “Print” you can get your document down on paper.
In the Printer drop-down list you can choose your printer driver from a list of those installed or those that appear in your operating system.
In Windows, you can change the settings of the printer driver by clicking on the “Options” button.
Page Range: You can choose to print ![]() All pages, a
All pages, a ![]() Page Range or only the
Page Range or only the ![]() Current Page (this setting can also print an area that you have selected).
Current Page (this setting can also print an area that you have selected).
You can enter the number of copies of each document page you would like printed. If you are printing on a special type of paper, for example if you are printing labels that are split into 3 columns and 5 rows on one US-letter-sized piece of paper, then the number of copies equals the number of labels, in this case 15 copies.
In Windows (depending on your printer driver) you can choose to collate your documents, meaning that they will come out in a complete set, instead of 5 copies of page 1, 5 copies of page 2, etc. This option means that each copy will be sent individually and the printing time could take longer.
On a Mac, the print dialog has many drop-down lists that offer different system-settings. These include “Layout,” “Scheduler,” “Paper Handling,” “Color Matching,” “Cover Page,” “Troubleshooting,” “Paper Feed,” and “Summary.” Normally you won’t need to change these settings unless you need to change something that is not already in Papyrus Author.
The “Papyrus” print page is particularly useful because Papyrus Author offers special printing options.
In Windows, the following options are available from the start.
If you have selected “ ![]() Save printer settings within this document,” the settings specific to Papyrus Author (under *Special Print Options) as well as the printer driver choice and its settings will be saved with the current document.
Save printer settings within this document,” the settings specific to Papyrus Author (under *Special Print Options) as well as the printer driver choice and its settings will be saved with the current document.
“Save as PDF…” will open the “PDF Export” dialog.
On Macs there is an additional “PDF” option, which can be used as an alternative to the Papyrus PDF, however it is missing some of the features of Papyrus Author’s.
There are also options for you to print ![]() Right (odd numbered) pages and/or
Right (odd numbered) pages and/or ![]() Left (even numbered) pages.
Left (even numbered) pages. ![]() Sort pages backwards (the last page will be printed first) is useful for when you printed only the left pages and then return the stack to the print to print the back side.
Sort pages backwards (the last page will be printed first) is useful for when you printed only the left pages and then return the stack to the print to print the back side.
In the Papyrus-Internal Printing Queue… you can first collect print tasks and then print them out all at once.
Under “Special Print Options…” you will find options for sorting your pages for binding, zoom options, etc. The settings you chose here will only be used when you select “ ![]() Use Special Options.” This allows you to turn all of these special options on or off with one click.
Use Special Options.” This allows you to turn all of these special options on or off with one click.
Print Queue
The print queue dialog collects all printing tasks with the same paper format and organizes them into blocks. When printing labels, for example, this allows you to print an entire sheet at once without having to leave a large portion of the labels blank.
All print tasks will be organized into a list with the document name, page range, number of copies, and the paper format.
Under “Entries” you can choose a task and move it up or down in the queue, or delete it.
The radio buttons under “Status” allow you to choose whether you would like to use the print queue or not (if not, select “ ![]() Unused”). You can also choose to first “
Unused”). You can also choose to first “ ![]() Accumulate” print tasks without printing and then select “
Accumulate” print tasks without printing and then select “ ![]() Active” to start printing.
Active” to start printing.
The “Close” button on the lower right corner of the dialog will close it and bring you back to the main print dialog.
Special Print Options
Special Print Options
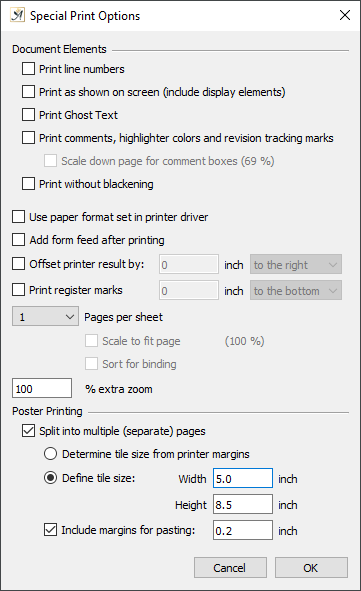
The “Special Print Options” can be accessed with a button in the “Print” dialog.
If you would like to see the display elements in your text (line breaks, spaces, underlining from spell/grammar check, etc.) on paper, you can select “ ![]() Print as shown on screen.” This dialog also has options to print comments or ghost text, which would otherwise only be visible on your screen.
Print as shown on screen.” This dialog also has options to print comments or ghost text, which would otherwise only be visible on your screen.
“Pages per sheet” allows you to print multiple document pages on one sheet of paper.
“ ![]() Scale to fit (X %)” shrinks the pages to fit on the appropriate amount of sheets, for example two pages on one US Letter sheet.
Scale to fit (X %)” shrinks the pages to fit on the appropriate amount of sheets, for example two pages on one US Letter sheet.
“ ![]() Sort for binding” will print out your pages and sort them automatically so that after folding them in the middle, they can directly be bound. This means the last page will be printed on the right side of the first sheet and the first page on the left. The second sheet will have page 2 on the left, the second to last page on the right, and so on. When printing with the “sort for binding” option, the number of pages needs to be divisible by four, which means that empty pages will be added to the end of your document.
Sort for binding” will print out your pages and sort them automatically so that after folding them in the middle, they can directly be bound. This means the last page will be printed on the right side of the first sheet and the first page on the left. The second sheet will have page 2 on the left, the second to last page on the right, and so on. When printing with the “sort for binding” option, the number of pages needs to be divisible by four, which means that empty pages will be added to the end of your document.
If you want to print the front and back pages separately, you can use the “sort for binding” option and then control which pages will be printed out in the main print dialog.
To make your document larger or smaller you can use the “ ![]() Extra Zoom” option, which allows you to set a percent value.
Extra Zoom” option, which allows you to set a percent value.
If the printed result does not match the paper because of the printer, you can choose the option “ ![]() Offset printer result by,” which will allow you to shift the document around to better fit your printer. This is an easy fix for when the printout on every page is shifted in the same direction.
Offset printer result by,” which will allow you to shift the document around to better fit your printer. This is an easy fix for when the printout on every page is shifted in the same direction.
Some printers require a blank page printed after your document in order to force the pages out of the printer. If this is the case for your printer, you can select the option “ ![]() Add form feed after printing.”
Add form feed after printing.”
The “ ![]() Poster Printing” options are useful if you want to print out a large poster with your home printer; this will print out your poster in parts on normal-sized paper, which you can then piece together. For printing on non-standard paper, you may need to define margins for the pieces you print.
Poster Printing” options are useful if you want to print out a large poster with your home printer; this will print out your poster in parts on normal-sized paper, which you can then piece together. For printing on non-standard paper, you may need to define margins for the pieces you print.
The upper left tile of your poster will be printed first, followed by the rest of the top row, and so on. Margins for pasting together will be labeled as such. Because most printers have an area outside the printable margin, you will need to cut this extra edge from all your printed tiles. This is why we have designed the tiles so that the picture on the tile overlaps by 0.5 mm with the tile below it.
If you want to glue the pages end-to-end (if you are gluing them to a poster board, for example) you can turn off the pasting margins.
 on March 27, 2020