
Table of Contents
Papyrus Author has a variety of tables with different options (choose your layout, merge cells, change the line style/color, etc.) There are also calculation fields made specifically for table calculation in your text document. For an overview of all the calculation options, see the article for “calculation functions.”
Papyrus Author’s tables are not displayed in a separate window. All calculations take place within a normal Papyrus text document, even if you want to create a large table.
With the table function, you have numerous calculation options at your fingertips: simple (and advanced) math, statistics, trigonometry, string operations, date and time functions, links outside of your table, and much more.
Editing Columns, Rows, and Field Contents
When you highlight cells in a table, you can open the context menu ![]() for tables by right-clicking. Here you can insert columns to the left or the right. Rows can also be inserted above or below the current row.
for tables by right-clicking. Here you can insert columns to the left or the right. Rows can also be inserted above or below the current row.
The context menu can be used to highlight columns, rows and even entire tables.
The copy… and paste… options are also located here.
And finally, you can use the context menu to delete rows and columns.
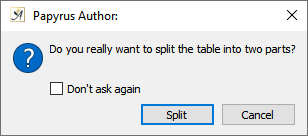
An alert box will pop up if you attempt to split a table
To create a new row, use the key combination ![]() +
+ ![]() (Win) or
(Win) or ![]() +
+ ![]() (Mac).
(Mac).
You can split a table in two with the key combination ![]() +
+ ![]() .
.
![]() +
+ ![]() +
+ ![]() will create a new blank line above the table, which is useful when you want to insert text above it.
will create a new blank line above the table, which is useful when you want to insert text above it.
To insert a new blank line under your table, use the combination ![]() +
+ ![]() .
.
Appearance of Table Fields and Lines
Table cells work very much like text objects with frames.
The appearance of cells in a table can be changed (width, line type, fill pattern, color, angle, etc.) either in Text Mode or Graphic Mode (accessed with the ![]() key).
key).
To select table fields, pull or drag ![]() your mouse over them.
your mouse over them.
You can also hold down the ![]() key (
key ( ![]() Mac) and click on individual cells to select them. The outside border of a table can be selected (in Graphic Mode) by clicking on it. Dividing lines between cells can be selected (also in Graphic Mode) by holding down the
Mac) and click on individual cells to select them. The outside border of a table can be selected (in Graphic Mode) by clicking on it. Dividing lines between cells can be selected (also in Graphic Mode) by holding down the ![]() key (
key ( ![]() Mac) and clicking on them.
Mac) and clicking on them.
Overview of Table-Related Dialogs
The “Table” tab is where you can create and edit an entire table.
“Table Cell” allows you to change the cell width, height, edges and text alignment. You can also merge cells and split cells in this dialog.
You can also give fields a name. This name can then be used as a link to other tables and even for calculations in other tables.
“Display Format” allows you to set the number formatting for one or more cells (with a comma or decimal point, as a percent, etc.).
The “HTML“ Properties determine the table width when displayed in HTML.
“Calculate in Field” (also under the menu “Insert” → “Table”) opens a new window where you can enter calculations into a field. You can add, multiply and carry out more complicated calculations here.
“Table” (Creating and Editing Tables)

The Table tab in the Table Properties
In this tab you can create and edit tables right in your text (including ones with calculated fields).
In the “Table” dialog you can set the frame style (how the lines around each cell will look), the number of rows and columns, as well as the alignment (left, center, right) and the size of the left indent.
Additional table rows can be added with the key combination ![]() (Win) /
(Win) / ![]() (Mac) +
(Mac) + ![]() (added above with
(added above with ![]() /
/ ![]() +
+ ![]() +
+ ![]() ); additional columns can be added in this dialog or in the context menu for tables by clicking on sub-menu “column”.
); additional columns can be added in this dialog or in the context menu for tables by clicking on sub-menu “column”.
These settings can be changed at any time, so don’t worry if you don’t exactly know how you want your table to look when you create it. You can always change it later.
The settings can be applied to your table with the ![]() button.
button.
“Table Cell” (Width, Height, Margins, Text Alignment…)
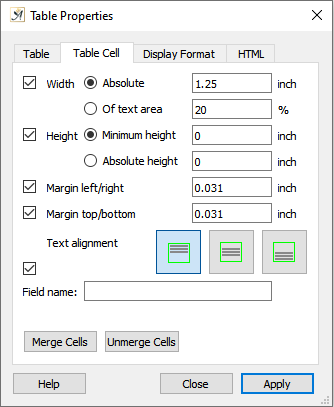
The Table Cell tab
Table cells in an already existing table can be selected by holding down your mouse and dragging over the cells.
After you have selected an area of cells, you can choose the “Width” and “Height” (these settings will also influence the size of your columns and rows), as well as the “margins” (“left/right” and “top/bottom”).
In “Text alignment” you can decide whether you would like the text within the table cell to be aligned on the “top,” “centered,” or “bottom.”
Once you have selected more than one table cell with your mouse (above, below, or both), you can use the “merge cells” button to merge them into one cell; the “unmerge cells” button will split them up again.
Values for width, height, etc. can all be activated or deactivated with the “activate” buttons on the left side of the dialog; the settings of those fields that have been activated will be applied with the ![]() button and those that have not will be ignored.
button and those that have not will be ignored.
The “Field Name” (or “Label”) allows you to name a cell, which can then be referenced from another calculation in another table. You can do this by setting the label in brackets (“[FIELDLABEL]”) and using it in the calculated field formula (known as a 3D link).
You can even make a “4D” link to a table cell in another document using this type of label. Simply include the file path separated by a hashtag (#) before the label name. The file path can be either relative to your current document (“[RelPath\GetFile.pap#LableName]”) or absolute by including the partition (“[C:\AbsolutePath\GetFile.pap#LableName]”).
Warning: References like these refer to the saved version of a document and do not reflect unsaved changes you have made to a document you currently have open.
“Display” (Number Formats, Percent, Decimal Places…)
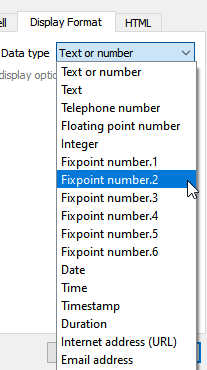
The Display Format tab
In this dialog you can change the display format for the data in a table field (= cell). These settings are either valid for the cell in which your cursor is located or for an area of selected cells.
The content of a field assigned the data type “Text or number” will remain exactly as you have entered it.
Papyrus Author makes every attempt to interpret the numbers you enter correctly.
A field labeled simply as “Text” can also contain numbers, but if they are labeled “Text,” they cannot be used for calculations.
Formatted Numbers can be more precisely defined in the drop-down menus under “Number Format.” You can choose how you would like the thousandth place of a number to be displayed as well as the numbers after the decimal point and negative numbers. Negative numbers can be set to be displayed in red. There are also settings for how many decimal places you would like to appear, as well as whether Papyrus Author should use “Padding” to display the number of decimal places.
The decimal places can either be commercially rounded or, even if you have chosen not to show any decimal places, you can choose the “Exact Calculation” option.
Numbers can also be displayed in a “percent” and you can choose to add “text before” and “text after” (if, for example, you want to display a currency symbol such as “$” or if you want to use tabs to line up the numbers in your cells [TAB]).
“Calculated Field” (Formulas, Table Calculations)
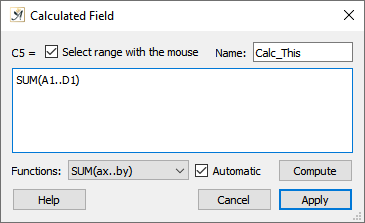
You can change a table field into a calculation field and then enter a formula
In this dialog you can enter a mathematical formula you would like to apply to a specific Papyrus Author Word table cell. This formula will then define the content of this cell.
A list of all calculation formulas with an overview and explanation of all calculation options (including how to add a comment to a calculated field) can be seen by following the article link.
Calculated fields will display a small triangle in the upper right corner of the cell.
You can also make absolute references to specific cells by using a combination of column letters A, B, C, … and row numbers 1, 2, 3, …
The cell reference for the cell you are currently working on can be seen in the upper left corner of the dialog.
Commonly used formulas are available in the “Functions” drop-down menu.
Cell areas used in a formula should be surrounded by parentheses and separated with two periods. For example, a sum of the first ten rows of a table for the 3rd and 4th column would look like this: Field F20 = SUM(C1..D10)
The calculated field that contains the result cannot be a part of the calculated area, otherwise you will see a warning from Papyrus Author for a cyclical field reference.
You can also enter a formula valid for an entire area of cells by selecting the area with your mouse and entering the correct formula for the upper left table cell.
The option to “Select range with the mouse” allows you to select a range with your mouse which then appears in the calculation.
You can either select a calculation from the “function” drop-down menu or enter it manually, and then use the option “select range with the mouse” to drag over the cell area you would like to use in the formula.
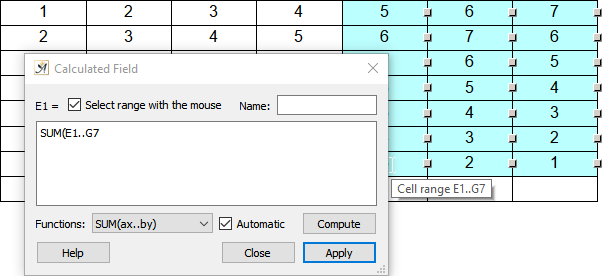
You can apply calculations for a range of table cells
Referencing Cells for Calculations
Hover over a cell for an info tooltip. Info is also shown in the status bar of your text window
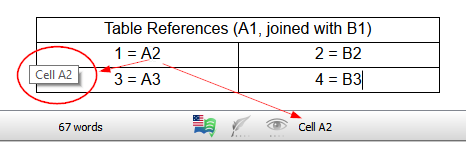
Cells and the numbers within them are used for calculations by referring to their position in the table (known as a Cell Reference).
Columns are labeled with a capital letter, rows, with a number. Cell D2 is, thus, in the fourth column of the second row.
The standard for indicating an area of cells is two decimal points (“..” = up through) between the start of the area and the end. For example, you can use the formula “SUM(A1..C5)” to display the sum of the cells from A1 to C5. This formula will add the numbers in cells “A1,” “B1,” and “C1” on through “A2,” “B2,” and “C3” all the way up to “A5,” “B5,” and “C5,” and give you a total.
You can also reference a cell by its cell name. This field name can be used in brackets for your formulas–for example, “[CELLNAME].” This allows you to create field references for cells that don’t even exist yet (though, of course, they need to be created later). If you enter a field reference without brackets, Papyrus Author will automatically check whether that cell exists and can be used for your calculation.
You can reference fields from cells in the table you are currently working on or in another table in the same document (3D). Fields can even be referenced from a table in another document (4D).
Brackets are used to reference a field in another document. The document name will appear before the cell name and will be separated by the pound sign (#), for example
“[D:\AbsPath\Callme.pap#MyCellName]”).
The file path can be either absolute (with the drive letter) or relative to the folder of the current document. Example: “[RelPath\Callme.pap#MyCellName]”.
Referencing a field with its letter and number is a relative reference. If the position of the field changes, Papyrus Author will adjust your formula accordingly. This is not the case if you reference a named field, however. These types of references are absolute.
For example, if you enter the following formula into column C:
C1=A1+B1 … continuing downwards, the formula will then read…
C2=A2+B2 … and so on and so forth.
 on March 26, 2020