
Table of Contents
Every document is assigned a “Paper Format.” When you open a new document, ![]() it will automatically be set to US Letter (for USA) or A4 (UK). Of course, you can change the paper format to work for example with posters, labels and books. Papyrus Author offers a paper format for nearly everything. If you don’t see exactly what you are looking for, you can also create your own.
it will automatically be set to US Letter (for USA) or A4 (UK). Of course, you can change the paper format to work for example with posters, labels and books. Papyrus Author offers a paper format for nearly everything. If you don’t see exactly what you are looking for, you can also create your own.
“E-Books,” though, are an exception when it comes to paper format. For e-books, there aren’t actually any pages and, thus, there are also no paper formats. The “pages” shown by e-book readers are not actually pages, but rather a set amount of text that appears as if it were a page. How much text will fit on the screen depends on the font size you have selected.
If you choose to write an e-book, you can leave the paper format as-is while you write. When you save it as an e-book in the end, only the chapters will matter, not the pages.
If you would like to work with a different paper format, for example to print a set of labels, this can be done in the “Paper Format” dialog (“Document” main menu → “Page Layout”). The most important paper formats will come with your version of Papyrus Author. You can also create your own paper format with your own measurements.
“Paper Format” Dialog
In the “Paper Format” dialog (“Document” main menu → “Page Layout”) you can choose one of the paper formats that comes with Papyrus Author, or create one of your own by clicking on “+.”
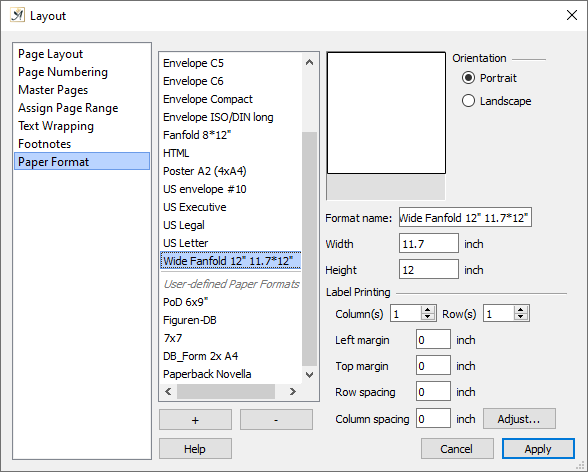
Papyrus Author offers a wide variety of paper formats to choose from
If you want to delete a format, you can select it with your mouse and click on “–.”
You also have options for:
- “Width”
- “Height”
- “Portrait” or “Landscape” (landscape format will be rotated 90 degrees for printing)
The current paper format will be shown in a little preview window of the “Paper Format” dialog.
Paper formats can also be distributed in another base paper format, for example labels or business cards can be organized into columns or rows on a standard US-Letter page.
For labels, you can adjust the “Column spacing” and “Row Spacing” between each label. You can also adjust the “Left margin” and “Top margin” of the base format.
“Adjust…” will open a dialog, in which you can make fine adjustments for the paper feed in a continuous printer.
If you open an unknown paper format in Papyrus Author, you will be asked whether you would like to import the unknown paper format or whether it should be changed into US-Letter.
In this dialog you can also change the paper format for an already existing document (which will change the margins to fit the appropriate format).
Fine Adjustment of Paper Size
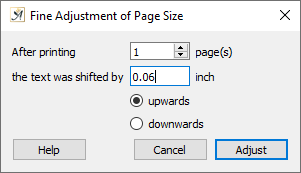
You can fine adjust page sizes to fit your printer
The “Adjust” sub-dialog of “Paper Format” allows you to make fine adjustments for the paper feed in a continuous printer.
Even a very small difference in positioning can be a big deal if you are printing anything extensive. This can, though, be corrected in this dialog, because such positioning differences are consistent within one printer. Papyrus Author works with a resolution of a thousandth of a millimeter, so the correction is very precise.
To adjust the positioning, simply enter “After printing X page (s)” → “text was shifted by Y mm” → “upwards” or “downwards” and hit the “Adjust” button.
Labels, Posters, and more
Papyrus Author has paper formats for your labels, business cards, and the like. Simply enter how many columns and rows your labels have as well as the width of the margin around the labels.
Default supported sheet sizes are “US letter” and “A4” as well as all the typical book sizes, from “Pocket Books” to “Royal” hard-covers.
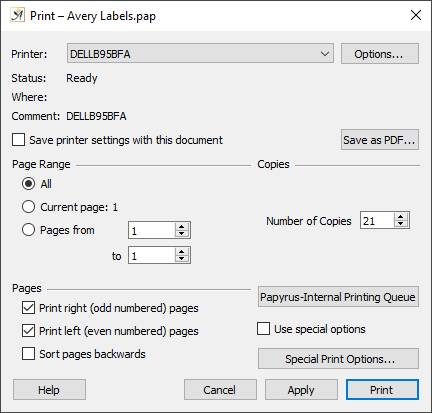
Papyrus Author lets you print labels efficiently and fitting to your needs
You can print your labels on as many sheets as you like. When you go to print, you should enter the number of labels you would like to print, not the number of label sheets. For example, if your label sheet has 2 columns and 3 rows, “6” is automatically set in the “Number of Copies.”
If you have already printed on a sheet of labels, but still have a few blank ones left, there is also a way to print on only the remaining blank labels. Let’s say your sheet has 6 labels total and you have already printed on 2 of them. You can print a blank label onto the first 2 and then print the remaining 4 with the appropriate text. Alternatively, if your labels are symmetrical, you can also simply turn the sheet around.
You can also print labels that span more than one label itself. Say you have a label that takes up 3 “pages” or 3 label stickers, you can print this out 8 times and fill your sheet of 24 label stickers.
Finally, you can use Papyrus Author’s print queue system. This allows you to print, for example, 10 labels of one type and 14 of another. By activating the queue system, the labels will all print out and use the entire sheet of 24 labels.
Poster Format
Papyrus Author can also work with large formats like a poster.
If you decide to print a format that is actually larger than your printer, A2 for example, Papyrus Author will help you piece together all printed parts by printing on the edges exactly which piece should be attached where, so that your poster fits together in the end.
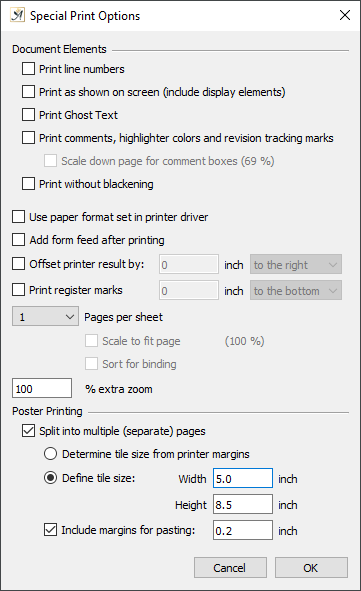
Papyrus Author marks the poster tiles for you, so that you can easily put them together after printing
 on March 27, 2020