
Table of Contents
- 1 Graphic Import: Embedding Graphics Into a Document
- 2 Size and Position of Graphic Objects
- 3 Picture Size
- 4 Anchoring Graphic Objects to Text or to a Page
- 5 Text Wrapping Around Graphic Objects
- 6 Picture Caption
- 7 Fill Pattern
- 8 Vector Graphic Objects (Rectangle, Circle…) and Lines
- 9 The Picture Catalog
- 10 “Picture” Settings for Picture References in HTML-Import and Picture Deletions

An activated graphic object
You can create and alter graphic objects in the “Insert” menu → “Graphics“. To manipulate a picture or graphic object you need to activate it by clicking on it with your mouse. Once a graphic object has been activated, eight resizing handles will appear around its edge.
You can activate more than one graphic object at the same time by holding down the ![]() button.
button.
Graphic objects can also be moved with your mouse or copied by holding down the ![]() -key.
-key.
You can enlarge or reduce the size of a graphic object by clicking on the resizing handles and pulling in the direction you choose. If you want to keep the same width/height ratio as you expand or reduce the object, hold down the ![]() button as you move it. If you are working with a line, use the
button as you move it. If you are working with a line, use the ![]() key to ensure the line can only be changed vertically or horizontally.
key to ensure the line can only be changed vertically or horizontally.
The Dimensions dialog can be used to precisely size and place your graphic object. To adjust the size of your picture you can also use the Picture Size dialog.
Once in graphic mode, you can use the arrow keys ![]() /
/ ![]() /
/ ![]() /
/ ![]() to further position the selected graphic object. You can set the distance for each keystroke under “Preferences” in the “Keyboard & Mouse” dialog.
to further position the selected graphic object. You can set the distance for each keystroke under “Preferences” in the “Keyboard & Mouse” dialog.
Graphic objects can also be protected from unwanted changes by clicking on “Position” in the context menu (right-click ![]() on an object) and choosing “lock.” A locked object can’t be moved or resized until you unlock it.
on an object) and choosing “lock.” A locked object can’t be moved or resized until you unlock it.
Graphic objects can be grouped together (menu “Insert” → “Graphics” or in the context menu ![]() ). Grouped objects are moved, resized and copied together. This can be useful for small graphics, such as small arrows and circles explaining larger elements of the picture. If you want to work with the grouped pictures as single elements again, you will first need to ungroup them in the context menu
). Grouped objects are moved, resized and copied together. This can be useful for small graphics, such as small arrows and circles explaining larger elements of the picture. If you want to work with the grouped pictures as single elements again, you will first need to ungroup them in the context menu ![]() .
.
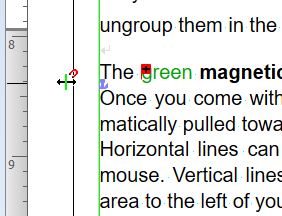
Green magnetic smart guides can be pulled out of the ruler and the areas to the left of your text
The green magnetic smart guides are there to help you position your object. Once you come within 3 mm of one of these lines, your object will be automatically pulled toward it.
Horizontal lines can be pulled out of the ruler below the toolbar with your mouse. Vertical lines can be pulled from the vertical ruler or from the small area to the left of your text.
These lines can be moved in 2 mm increments. If you want complete freedom to move your object, hold down the ![]() key and move it as you choose.
key and move it as you choose.
If you don’t want your object to be pulled toward the line, you can also move it while holding down the ![]() key.
key.
To get rid of these lines, simply grab onto the lines with your mouse ![]() and pull it outside of the text area.
and pull it outside of the text area.
You can hide these lines by choosing “Display as Print Preview” under the menu “View.” These lines will still “work” in this mode, but you won’t be able to see them.
More graphic options can be found in the context menu (right-click ![]() on an object), for example labeling a picture, exporting a picture, or showing it in the picture catalog.
on an object), for example labeling a picture, exporting a picture, or showing it in the picture catalog.
Graphic Import: Embedding Graphics Into a Document
The first time you import a picture into a document, Papyrus Author will ask whether you would like the picture embedded in the document or if you would like to save it as a reference file.
This pop-up dialog also allows you to choose whether pictures should always be embedded or always saved as a reference in the future.
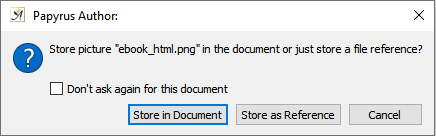
Embed the picture in the document or store a file reference
If you want to change your decision about how new pictures are saved, you can do so in the “Graphics” dialog (“Document” → “Document Properties” → “Graphics”).
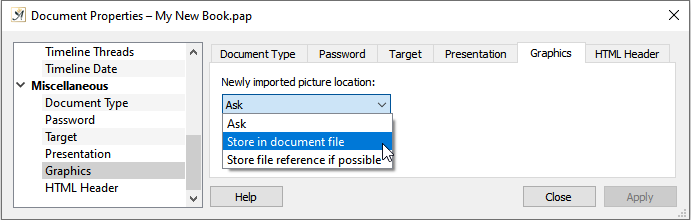
The Graphics dialog
“Ask” will cause the pop-up to appear each time you import a picture. The other two options will determine what Papyrus Author should do each time a picture is imported.
Size and Position of Graphic Objects
The Dimensions dialog (“Insert” → “Graphics” → “ Graphic Properties”) contains settings for the size and positioning of graphic objects.
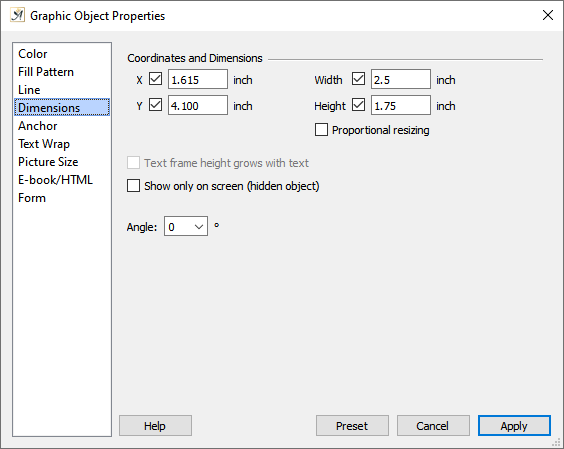
The Dimensions settings
If you want to change the settings for a graphic object in this dialog, you will first need to activate it by clicking on it
The positioning is entered in the “ ![]() X” and “
X” and “ ![]() Y” coordinates in “inch” and you can also enter precise settings for the “
Y” coordinates in “inch” and you can also enter precise settings for the “ ![]() Width”” and “
Width”” and “ ![]() Height.”
Height.”
Please be aware that any adjustments made to the positioning of your graphic object may also affect the object’s anchoring.
You can decide whether you would like these parameters to be changed or not by selecting or deselecting the checkboxes.
You can change the positioning for a group or graphic objects, for example by choosing a left-alignment when only the “X” parameter has been selected. The other parameters will remain unchanged.
The checkbox “ ![]() Text frame height grows with text” can be used for text objects and is especially useful for sticky notes. This way the note can grow vertically according to the amount of text it contains.
Text frame height grows with text” can be used for text objects and is especially useful for sticky notes. This way the note can grow vertically according to the amount of text it contains.
“ ![]() Proportional Resizing” will allow you to change the size of the graphic object, but only according to the current width/height proportions. This can also be done by holding down
Proportional Resizing” will allow you to change the size of the graphic object, but only according to the current width/height proportions. This can also be done by holding down ![]() (Win) /
(Win) / ![]() (Mac) and using the resizing handles to make the object larger or smaller.
(Mac) and using the resizing handles to make the object larger or smaller.
The option “ ![]() Show only on screen (hidden object)” allows you to hide certain text and graphic objects that you want to use for your own notes and comments, but would rather not see on a print out.
Show only on screen (hidden object)” allows you to hide certain text and graphic objects that you want to use for your own notes and comments, but would rather not see on a print out.
Sticky notes, for example, are preset to be hidden objects.
The angle of your graphic object can be moved in 90-degree increments, or you can enter a degree of your choice.
If you would like to save your settings in this dialog and apply them to all newly opened or created graphic objects, you can use the button “preset.”
Picture Size
The “Picture Size ” dialog (“Insert” → “Graphics ” → “Graphic Properties”) allows you to change the size of a picture by either enlarging or shrinking by a certain factor (integers or decimals).
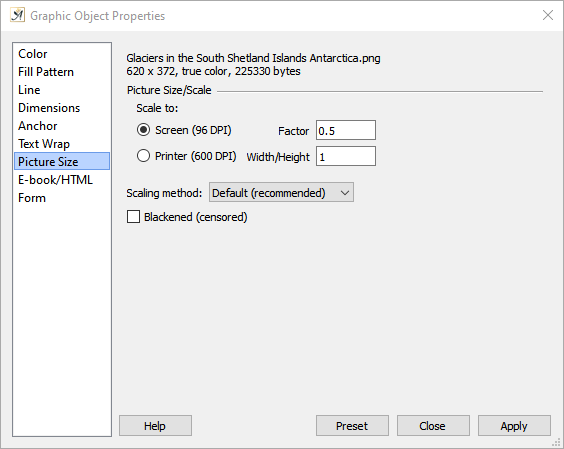
The Picture Size settings
The basis for the factor is “1,” which means that one picture pixel will show up on your screen as one picture pixel. A factor of “2” means that 1 pixel in the original picture will show up as four on the display device (2 vertical and 2 horizontal).
If you want to change the settings for a graphic object in this dialog, you will first need to activate it by clicking on it.
You can use the radio buttons “ ![]() Screen” or “
Screen” or “ ![]() Printer” to specify which device should be used as a reference: a factor of 1 is either 1 screen pixel or 1 printer pixel. Your choice here will depend on whether your document is more likely to be read on a screen or on paper.
Printer” to specify which device should be used as a reference: a factor of 1 is either 1 screen pixel or 1 printer pixel. Your choice here will depend on whether your document is more likely to be read on a screen or on paper.
If you select the printer option and you use more than one printer with your computer, it is important to make sure that the printer driver you have selected as your standard is actually the one you want to use to print your document. Papyrus Author will take the resolution of your standard printer and optimize the picture size accordingly.
It is also possible to distort the width/height ratio in this dialog.
If you would like to save your settings in this dialog and apply them to all newly opened or created graphic objects, you can use the button “preset.”
Anchoring Graphic Objects to Text or to a Page
If a graphic object is anchored to the text around it, it will move with the text when you add extra sentences or paragraphs above.
If you want to change the settings for a graphic object in this dialog, you will first need to activate it by clicking on it.
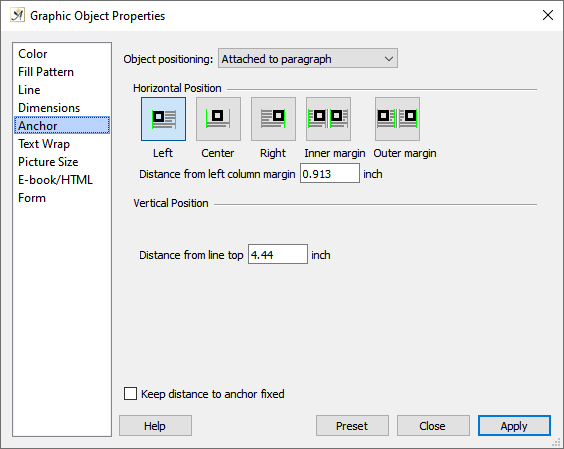
The Anchor settings
A graphic object can be either …
- anchored to the text, meaning that it moves vertically with the text to which it is attached (if text is added or deleted above the anchored position, it will move with the text),
- specially anchored, meaning that it is anchored to a page, as a marginal text, etc.
… or it can be …
- not anchored, meaning it will simply sit off to the side without any attachment to the text. Whatever is done to the text will not affect the positioning of the graphic object.
The spot to which each graphic object is anchored can be seen by a small anchor symbol![]() . If a graphic object is moved, a line from the middle of the object to the anchor will appear.
. If a graphic object is moved, a line from the middle of the object to the anchor will appear.
This relative anchoring can be assigned specific points on your page, which are visible in the dialog positioning boxes:
- The most commonly used anchoring is “Attached to paragraph.” This setting allows the graphic object to move vertically with the paragraph, but will not change position horizontally.
When graphic objects are especially large, it is best to only anchor them to the beginning of the paragraph so they aren’t constantly moving across your page. - Smaller graphic objects can be anchored in the running text and move along with it. This anchoring is called “Character with width and height.” The option allows your smaller objects to move with your running text (it’s best to insert a space before and after the graphic object). If you want to anchor a small picture to a specific spot in your text, you can add fixed spaces with
 +
+  (“spacebar”) [Win] or
  + (“spacebar”) [Mac].
 - You can add small text objects (e.g. for a short comment or explanation) to the margins of your text with the positioning “As marginal text.”
- A graphic object that is anchored “To the page” will stay on the same page to which it is anchored, but will not move with any specific spot in the text.
- If you would like to create your own anchoring, simply choose “Special” under “Object Positioning” and anchor your graphic object exactly as you want.
For mirrored page layouts (e.g. for books or brochures) you can choose to position the object on the inner or outer margin.
There is also an option to set the X and Y coordinates relative to the spot you have anchored your graphic object to.
If your horizontal position is left, you will enter the distance from the left column margin; if the position is right, the distance from the right column margin. If you have anchored to the page, the distance is from the left page border and if you are anchored to a character, the distance from the anchor character.
The Y coordinate, or the vertical positioning, is always the upper edge of the anchor point (paragraph, page, etc.).
Selecting the checkbox “ ![]() Keep distance to anchor fixed” keeps the distance between the object and its anchor constant, so that accidentally moving it with your mouse will not change its position relative to the anchor.
Keep distance to anchor fixed” keeps the distance between the object and its anchor constant, so that accidentally moving it with your mouse will not change its position relative to the anchor.
If you would like to save your settings in this dialog and apply them to all newly opened or created graphic objects, you can use the button “preset.”
Text Wrapping Around Graphic Objects
Settings for text wrapping can be accessed in the “Text Wrap” dialog (“Insert” → “Graphics” → “Graphic Properties.”)
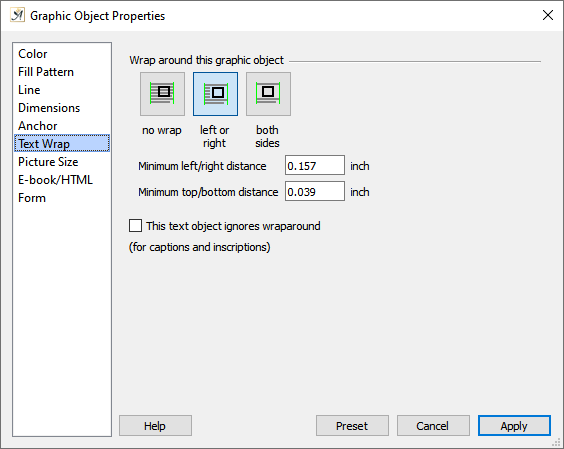
The Text Wrap settings
“Wrap around this graphic object” will cause the main text to wrap around your graphic object and prevents your object from being moved or the text from sitting too close to or even behind your object.
You can adjust the “minimum left/right distance” as well as the “minimum top/bottom distance” that you would like between your graphic object and your running text.
“ ![]() This text object ignores wraparound” is used for text objects such as captions and allows you to place a caption closer to your graphic object than you would want your main text to be.
This text object ignores wraparound” is used for text objects such as captions and allows you to place a caption closer to your graphic object than you would want your main text to be.
If you want to change the settings for a graphic object in this dialog, you will first need to activate it by clicking on it.
If you would like to save your settings in this dialog and apply them to all newly opened or created graphic objects, you can use the button “preset.”
Picture Caption
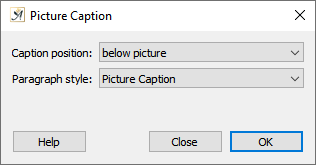
The Picture Caption dialog
When you right-click on a picture in your document, and open the “Picture Caption” dialog, you can set which corner (below, above, left, right) of the picture your new caption will be aligned with.
Under “Paragraph style” you can select the type of style you would like to use for your picture caption. You can find a list of all style templates by clicking on the ![]() icon in the toolbar (you can choose one that comes with Papyrus Author or define your own).
icon in the toolbar (you can choose one that comes with Papyrus Author or define your own).
Fill Pattern
The “Fill Pattern” dialog (“Insert” → “Graphics” → “Graphic Properties”) allows you to assign one of the fill patterns available in your operating system to the background of your graphic object.
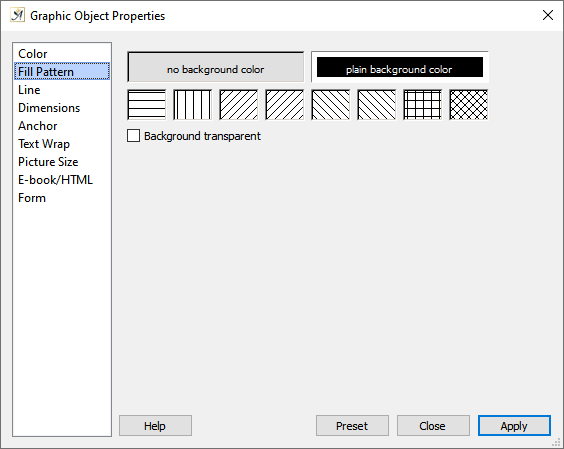
The Fill Pattern settings
To do this, it is important that you have selected “plain background color,” if you would like to assign the background of your vector graphic object like a circle or rectangle a color.
“Background transparent” needs to be selected if you would like your graphic object to be transparent.
If you want to change the settings for a graphic object in this dialog, you will first need to activate the object by clicking on it.
If you would like to save your settings in this dialog and apply them to all newly opened or created graphic objects, you can use the button “preset.”
Vector Graphic Objects (Rectangle, Circle…) and Lines
The menu option “Graphics” under the “Insert” menu also allows you to create a new graphic object, such as a “Text Frame,” “Rectangle,” “Circle,” and a “Line.”
In the “Line” dialog (“Insert” → “Graphics” → “Graphic Properties”) you can choose a setting for the Line Width, or you can enter your own in millimeters.
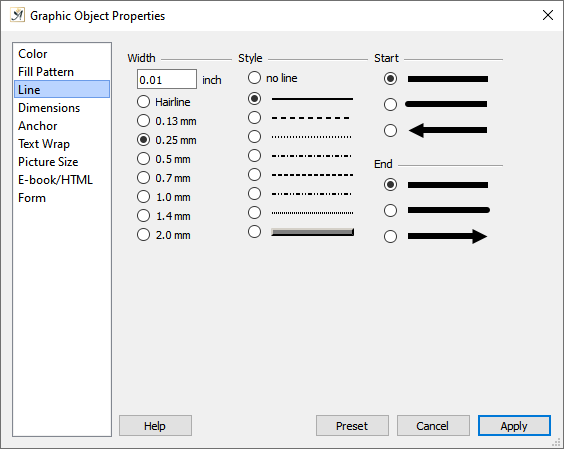
The Line dialog
Under “Style“, you can choose whether you would like the line to be invisible (no line), broken, or unbroken.
There are also settings for the “Start” and “End” of the line (normal, rounded, or arrow).
Depending on your version of Windows, you may not have all of the line style options. If that is the case, line styles may appear more than once in this dialog.
If you want to change the settings for a graphic object in this dialog, you will first need to activate it by clicking on it.
If you would like to save your settings in this dialog and apply them to all newly opened or created graphic objects, you can use the button “Preset.”
The Picture Catalog
The Picture Catalog dialog is the list of all pictures used in your document.
The ![]() “Add…” icon will add a new picture to the list. Unlike when you import a graphic into the Papyrus Author document, the picture you add to the picture catalog will not immediately be inserted in your text.
“Add…” icon will add a new picture to the list. Unlike when you import a graphic into the Papyrus Author document, the picture you add to the picture catalog will not immediately be inserted in your text.
The ![]() “Export…” icon will export a picture you have selected; the
“Export…” icon will export a picture you have selected; the ![]() icon “removes” a picture from the picture catalog (as long as it is not currently being used in your text).
icon “removes” a picture from the picture catalog (as long as it is not currently being used in your text).
The ![]() “Locate” icon will jump directly to the spot in your text where a specific picture or part of a picture has been used.
“Locate” icon will jump directly to the spot in your text where a specific picture or part of a picture has been used.
You can also see the name of each picture in the list (as well as other information such as the size in bytes and pixels, the color and the path, and whether the picture has been saved in the document or externally as a “reference”).
In the drop-down list you can choose a zoom option.
You can activate a picture by clicking on it. To select a part of the picture you can click and drag with your mouse. If you want to select the part you have just highlighted hit the ![]() – key (Win) /
– key (Win) / ![]() (Mac) and the old frame around the picture will disappear.
(Mac) and the old frame around the picture will disappear.
The ![]() “Insert” icon will insert this part of your picture or the entire picture into your text. You can also drag either the picture or part of your picture into your text window.
“Insert” icon will insert this part of your picture or the entire picture into your text. You can also drag either the picture or part of your picture into your text window.
![]() “Help” will bring up a help text.
“Help” will bring up a help text.
All of these options can also be accessed in the context menu by right-clicking. You can also use the context menu to select a background picture for your current Papyrus Author document.
These context menu functions are especially useful when you want to convert an internally saved picture to an external picture or if you want to replace a picture with a different (e.g. newer) picture.
You can also use the context menu to export an internally saved picture, enabling you to switch between an internally and externally saved picture as you like.
“Picture” Settings for Picture References in HTML-Import and Picture Deletions
The Picture dialog can be accessed in the Papyrus Author menu “Preferences” → “Documents” → “Pictures.”
When you open HTML documents, the pictures are stored in external file references. If you are planning to work on an HTML document, which will later also be saved in HTML, it makes sense to keep the pictures in external files. This can be set under “Conversion of picture references during HTML import” under “Store file reference if possible.”
If, however, you would like to open an HTML document and edit it as a Papyrus Author document, it makes more sense to store the pictures in the document itself by selecting “Store in document file.”
There is also a setting here for “When the last instance of a picture is deleted,” meaning what will happen when there are no more copies or parts of a picture left in the document.
Sometimes, even if you have deleted the picture from your text, you may want to keep a copy of it in the picture catalog.
Here you have the option to tell Papyrus Author what should happen when you delete a picture: should it “Leave the picture in the catalog,” “Remove the picture from the catalog,” or “Ask” you before proceeding.
 on March 31, 2020