
Table of Contents
Creating a Table of Contents
The “Table of Contents” can be generated under the “Document” menu.
Here you can select the settings for the position, numbering, etc. and then hit “Insert Table of Contents.” You can also use this dialog to “Update Table of Contents” if you already have one (or you can do this in the context menu ![]() of the table of contents itself).
of the table of contents itself).
The table of contents can be located at the beginning of the text or right before the page you are currently working on. This method allows you to have a few pages before the table of contents, for example the “Front Matter.”
The table of contents will not be updated continuously, but will be updated automatically when you save, print or export the document. You can also tell Papyrus Author to update it with the key combination ![]() +
+ ![]() . The entries in the table of contents are linked as cross-references, so they will always be updated if you change the text. Only new entries or changes to the page number need to be updated.
. The entries in the table of contents are linked as cross-references, so they will always be updated if you change the text. Only new entries or changes to the page number need to be updated.
If you want to make changes to the table of contents, which are otherwise performed automatically, you will need to check the box “Only update the tables by user action (not automatically).” This prevents your changes from being undone by the automatic updates. These types of changes should only be done directly before you send off your text, because any additional changes you make to the text after turning off the automatic updates will not show up in your table of contents.
And that’s it for a proper, standardized table of contents for your text.
The “Table of Contents” Dialog
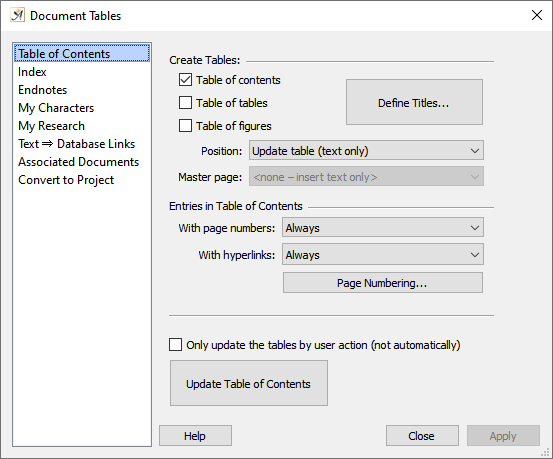
This is where you can create a table of contents (and a table of your tables and figures).
The Table of Contents dialog
By clicking on the large button at the bottom, you can “Insert Table of Contents.” (If you have already inserted one, you can update it with this button.)
The “Define Titles” button allows you to make changes to the headings in your various tables. Table headings use Papyrus Author’s style template “table title.”
There is a drop-down menu for the positioning of your table allowing you to choose where you would like your table to appear, for example at the beginning of your document.
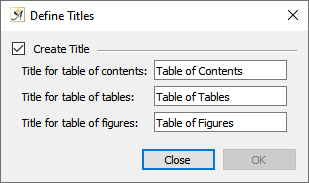
You can change the titles of your table
If your text has an introduction before the table of contents, you can place your cursor where you would like your table to appear and choose “Current text cursor position.” If you want your table to have its own master page, you can select “In front of current page (with master page).” If you have chosen an option under “Position” that includes a master page, choose an appropriate “Master page” in the next drop-down menu.
In the lower half of the “Table of Contents” dialog you can choose whether you would like to add page numbers. Choosing to leave the page numbers out is a good idea if you are working on an e-book. There is also an option to create your chapter headings “With hyperlinks,” which is useful if you are creating an e-book or a PDF.
The page number and hyperlink drop-down menus also have an option to allow the style template of the heading to decide whether page numbers or hyperlinks should be used (found in the “Enumeration/Table of Contents” tab of the “Style Template” dialog).
The “Page Numbering” button will bring you to the “Page Numbering” layout dialog, where you can set on which page you would like to begin numbering your main text and table of contents. You can also choose the type of numbering–Arabic, Roman, uppercase, lowercase, etc.
Headings in the Table of Contents
Of course, you don’t want a heading that is large and bold in the main text to also look like that in the table of contents.
Papyrus Author takes care of this automatically.
Here is how we take a bold heading and turn it into a normal line in the table of contents: For the heading options already available in Papyrus Author, it is especially easy. These include “Title” and the numbered options “Heading 1” through “Heading 4.”
Each of these headings is shown in the table of contents in an appropriate style template. These are exactly like the style templates for the main text, except the words “(Table of Contents)” follow the name of the heading.
Because you won’t normally need these special style templates, they are not automatically shown.
When an unknown style template that has been defined as a headline is taken from the main text and added to the table of contents, it will be given a preset format with the name “Table of Contents.” This will create an appropriate-looking line in your table of contents.
If you wish, you can also design your table of contents completely on your own with custom style templates, although the style templates Papyrus Author already offers are sufficient for most cases.
Creating Table of Contents With Your Own Style Templates
You can define how your headings with customized style templates will look in the table of contents.
You can easily take a format from the main text and assign it the appropriate format in the table of contents. Papyrus Author is flexible and allows you to create your table of contents as you see fit. After that, Papyrus Author will apply your customized settings automatically.
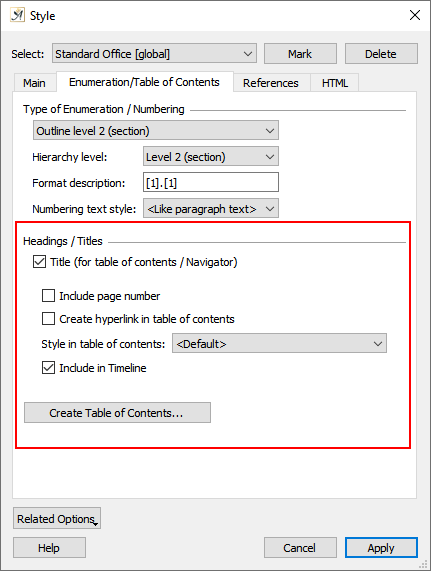
The Enumeration/Table of Contents part of the Style dialog lets you define the style of table of content headings
The “Style” dialog in the “Paragraph” menu is where you can assign a main text template to a template in the table of contents (under the Enumeration/Table of Contents tab). The template you want to use in the table of contents must, of course, be available in the document you are working on.
The corresponding table of contents style template can be assigned any name. We recommend using the same name followed by “…(Table of Contents).” This is also how the templates that come with Papyrus Author have been named.
Page Layout for Indices and Directories
The page layout for indices and directories can either be taken directly from the place in your text where you would like to insert them or you can use an appropriate master page.
The master pages can be accessed in the dialog “Document Tables” (menu “Document” → “Table of Contents” ).
Here you can also choose to use master pages you have created.
You can access predefined master pages as well as your own in the Table of Contents dialog
Special Template Documents for Indices and Directories
Papyrus Author will create your table of contents completely automatically with special templates. This works by using templates within the document.
An alternative that is more flexible, but which requires a bit more know-how, is to use our special template documents. They can be found in the folder (Papyrus Author)/Modules/Templates.fix and are called:
- For the table of contents: _content.pap (also used for the picture index and table index)
- For the index: _index.pap
The page layout for the table of contents and other indexes will be taken automatically from the master page of the template document.
In the template _content.pap you can also preset normal text, which will then be used as the title for your table of contents.
If there is a _content.pap template document in the folder of your text, it will overrule the _content.pap, which comes with Papyrus Author. So if you want to change a _content.pap for a certain text, copy this template document file from the Papyrus Author folder to your text folder and work from there.
If the master page “STANDARD” is used in _content.pap, this master page will show up in the document as “Table of Contents” (in order to prevent having the same name as the master page “Standard” in the main document).
Papyrus Author takes the style templates for the picture and table indexes out of the last line in _content.pap and inserts the text you entered.
The explanation for _content.pap is also valid for the page layout of the Index, only here the layout is taken from _index.pap.
In _index.pap there are two additional paragraph formats which determine how the key words in the index will look:
- Paragraph format “INDEX 1” determines how the main key words will look.
- Paragraph format “INDEX 2” determines how the second-layer key words will look (those categorized under a main key word).
Just like the table of contents, the index can be created without the use of an additional external document. If you want to create an index, you can simply use the formatting and page layout templates located in the document itself.
Creating Other Indices and Directories (Index, Endnotes, Literature Database)
In the menu “Document” under “Indices and Directories” you can open the dialog to create an index.
Creating the index does not require any preparation. Simply place your cursor on the word you would like entered into the index. Use the “Add Index Entry” (under Menu: “Insert”) to add it directly to the index.
The text in your endnotes (which can be used in addition to footnotes) are stored and managed in a database.
When you create your first endnote, the endnote database will be generated automatically and will be saved in the same place as your text. This endnote database belongs to your text and can be found in the folder with the same name as your text followed by the word “Endnotes.”
If you like, you can create your own database under “Endnotes” that will be used as your endnote database.
You can also link a literature database with your text and manage a bibliography.
Papyrus Author enables you to link any text passages with your literature database (Menu “Insert” under “Hypertext”). To do this, your text has to be assigned to your database in the “Text – Database Links (Hyperoffice)” Tab.
An appropriate master page can be found in the folder “Templates” under “Literature.db”.
Under the menu “Document” you can find the commands to create all indices and directories discussed so far.
Creating an Index

The Index dialog
The Index dialog is for creating and customizing an index for your document and can be found in the “Document” menu → “Indices and Directories.”
The menu to choose the positioning of the index can be found at the top of the dialog. Here you can decide if you would like your index at the end of your document, for example.
You can choose to insert the index simply as text or with a master page.
If your text has an appendix you would like to appear after the index, you can place your cursor where you would like the index and choose the position “current text cursor position.” If you want your index to have its own master page, you can select “in front of current page (with master page).”
If you have chosen an option under “Position” that includes a master page, choose an appropriate “master page” in the next drop-down menu.
The template “_INDEX.PAP” found in the Papyrus Author folder “\Modules\Templates.fix” also allows you to change the appearance of the index.
The option to “Insert this in front of sub-entries” allows you to insert a hyphen or a bullet point before your sub-entries, so they are visually separated from the main entries.
“Page Number Ranges” sets how page numbers are shown for those entries, that stretch over several pages.
They can appear with a hyphen in the page range (e.g. “ ![]() pages 12-34) or with the index options “
pages 12-34) or with the index options “ ![]() p” (=also found on the following page) and “
p” (=also found on the following page) and “ ![]() pp” (=also found on the following pages).
pp” (=also found on the following pages).
With the button “Insert Index” you can create your new index.
Adding an Index Entry
In the “Add Index Entry” dialog (found in the “Insert” menu) you can choose which words in your text you would like to appear in the index, which is sorted alphabetically and located at the end of your document. Here you can also “Generate Index.”
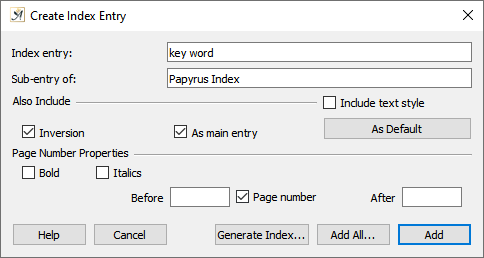
The Create Index Entry dialog
In the “Index Entry” field you will see the word currently selected in your text. You can change the text as you like before adding it to the index.
In the field “Sub-entry of” you can add the name of a category in your index under which the current word will appear. For example, if you enter the word “Ethanol” as a sub-entry of “Chemistry” then it will not appear under “E…,” but rather under “C…” by “Chemistry.” If you don’t enter anything in this field, you word will appear on its own in the alphabetic list.
Selecting the checkbox “ ![]() Inversion” means your index entry will appear under the sub-entry category and that the sub-entry category will appear below the index entry.
Inversion” means your index entry will appear under the sub-entry category and that the sub-entry category will appear below the index entry.
The checkbox “ ![]() As main entry” will include your index entry under the sub-entry and as a main entry of its own.
As main entry” will include your index entry under the sub-entry and as a main entry of its own.
If you select the “ ![]() Page Number” option, the page on which the index entry is located will appear after it in the index. You can use the checkboxes “
Page Number” option, the page on which the index entry is located will appear after it in the index. You can use the checkboxes “ ![]() Bold” and/or “
Bold” and/or “ ![]() Italics” to decide how the page numbers will be displayed. In the entry fields “Before” and “After” you can enter text that will appear on either side of the page number.
Italics” to decide how the page numbers will be displayed. In the entry fields “Before” and “After” you can enter text that will appear on either side of the page number.
Selecting the checkbox “ ![]() Include text style” means your index entry will appear in the index with the same text style that the word has in your text. This allows you to set off certain words with a different text style, for example if you have Greek words as index entries.
Include text style” means your index entry will appear in the index with the same text style that the word has in your text. This allows you to set off certain words with a different text style, for example if you have Greek words as index entries.
The button “As Default” will save all your settings in the Index Entry Dialog so that you don’t have to choose them again the next time you open the dialog. This is useful for entering many words as a sub-entry of the same word as you will not have to type the sub-entry category each time.
The button “Generate Index…” will open the dialog to generate the final index, so it should only be used once your text is finalized.
The “Add All…” button should be used with caution. This will take all the places in your text where this word appears (Papyrus Author will, however, ask you first) and add them to the index. This often leads to an index too full, which means it is hard for your reader to find exactly what he or she is looking for (which defeats the purpose of a good index).
You can, however, use the “Examine” button in the dialog that appears when you choose to add all and go through each entry to decide which to include which to leave out.
 on March 26, 2020