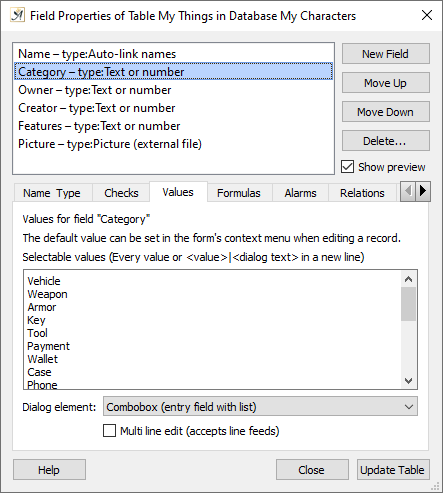
If you want to change the basic structure (type, description, number of data fields) of a database you have already created, you can do so without losing any data in the “Field Properties” dialog, located in the “Database” menu.
The list contains all fields in the database. Under the “Name Type” tab you can change the description (under “Field name”) and the “Data type” for each data field. These data types can be used to create a standard address database with specific pre-defined fields.
It is also possible, depending on the data type selected in the menu, to choose settings for numbers such as the number of decimal places that should be used, or to set the date format for a field containing a date.
The order of the fields can also be changed in this dialog by selecting a data field and using the “Move Up” or “Move Down” buttons.
Data fields (and with them, table columns) can be removed from the database with the “Delete…” button (Papyrus Author will ask if you are sure before deleting); new data fields can be created with the “New Field” button.
After confirming changes with the “Update Table” button, all changes you have selected in this dialog will be made to the database. If the “ ![]() Show Preview” checkbox is selected, you will see a preview window that shows how your database would look were you to carry out the changes.
Show Preview” checkbox is selected, you will see a preview window that shows how your database would look were you to carry out the changes.
In the “Checks” tab of the “Field Properties” dialog you can use the checkbox “ ![]() Entry always required” to determine whether this is a mandatory data field when filling out a new record.
Entry always required” to determine whether this is a mandatory data field when filling out a new record.
There is also a checkbox to determine whether you want to “ ![]() Spellcheck this field” or not. For fields containing only numbers this option is irrelevant, but for fields with running text it can be very helpful.
Spellcheck this field” or not. For fields containing only numbers this option is irrelevant, but for fields with running text it can be very helpful.
In this tab you have the option to enter “Help text” that will be displayed in the status bar at the bottom of the window.
Under “Values” you can define the field type for special types of data and how they will be displayed–combo box, popup (or drop-down), radio buttons or checkboxes.
The two tabs “Formulas” and “Relations” have been given their own Wiki articles.
“Compatibility” is necessary if you want to export to another database and want to limit the dBase format in any way (such as setting a fixed field length).
“Full Text Search” is used to take certain fields out of the full text search. This is especially useful for fields with long notes attached that are not necessarily relevant to find the data itself. Choosing this option for such data fields will keep your “*.IDX” index file smaller.
Setting Values for Fields (Combo Boxes, Popups, Radio buttons and Checkboxes)
In the “Selectable Values” area of the “Values” tab in “Field Properties,” you can enter a list of standard values for data types that are then available for that form (here: Combobox).

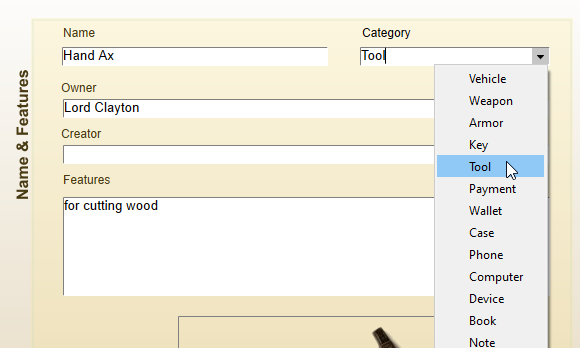
In the Values tab you can set values which are then available in your dialog element
You can also have radio buttons or checkboxes. The value selected in the entry form for a field that is shown before the line “|” (the line can be entered with the shortcut “AltGr+ [<]” [Win] or Alt+7 [Mac]) is the value content of this field for this record.
If you insert the line (this is optional) you can also enter value content for the field that differs from the text that will be shown in the entry form (text after the line).
The following field types are available:
“Combobox” is a list of values to choose from. The field can still be edited just like an entry field.
A “Popup” (or drop-down menu) is like a combo box, except that the field can no longer be edited. Only the values can be set.

A pop-up or drop-down menu
“Radio buttons” (![]() ). For every standard value there is a button to choose. When editing the database form, choose a large field that can contain all the radio buttons.
). For every standard value there is a button to choose. When editing the database form, choose a large field that can contain all the radio buttons.
“Checkboxes” ![]() can only be used if there are exactly two values. The first value is “checkbox on,” the second “checkbox off.”
can only be used if there are exactly two values. The first value is “checkbox on,” the second “checkbox off.”
Radio buttons and checkboxes can also be selected with the keyboard. You can use the arrow keys to move around and the spacebar to select. In a pop-up menu, the spacebar will open the list and you can enter the first letter of the option you want to select.
